🪰 How Do I Propagate My Nepenthes ampullaria?
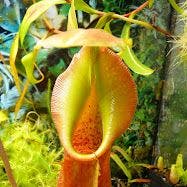
Nepenthes ampullaria
By the Greg Editorial Team
Feb 09, 2024•5 min read
This article was created with the help of AI so we can cover more plants for you. May contain errors. See one? Report it here.
Propagate your Nepenthes ampullaria 🌿 effortlessly with these expert techniques for lush growth!
- 🌱 Choose healthy stems or shoots for successful Nepenthes ampullaria propagation.
- 🌡️ Warmth (70-85°F) and high humidity are crucial for propagation.
- ✂️ Sterilize tools and use rooting hormone to prevent disease and encourage growth.
Snip & Plant: Stem Cutting Method
🌱 Choosing Your Champion: Selecting the best stem for propagation
To kick off your Nepenthes ampullaria propagation, scout for a hero stem—healthy, robust, and free from the clutches of pests or disease. Timing is crucial; spring into action when the plant is in its growth prime, usually spring or early summer.
✂️ Making the Cut: How to properly cut and prepare the stem
Sterilize your scissors or blade with alcohol to avoid introducing any nasty microbes. Then, make your move: a clean, angled cut just below a node, the hotspot for future roots. No rooting hormone? No panic. It's helpful but not a deal-breaker.
🌱 Rooting for Success: Encouraging root growth from your cutting
After the snip, it's time to get those roots rocking. Dip the cut end in rooting hormone if you've got it, and plant your cutting in a moist, well-draining medium. Patience is key—keep the faith and maintain ideal humidity, and you'll soon see signs of life.
Baby Shoots: Propagating from Basal Shoots
🍼 Spotting Potential
Identifying the right basal shoots for propagation is like picking the best apple from the tree. Look for shoots that are 7-10cm high with just-unfolding leaves. These youngsters should be sturdy and attached to the woody basal tissue, signaling readiness for independence.
✂️ The Gentle Separation
Sharp and clean—that's how your tools should be when separating basal shoots. Slice as close to the base as possible, taking a piece of the mother plant's woody tissue with it. This isn't a time for hesitation; a precise cut here can mean the difference between propagation success and failure. After the cut, treat your new plant baby like a nodal cutting. It's time to pot it up in a well-draining mix, keeping the soil moist but not soggy. Remember, these are delicate beginnings, so handle with care and provide a humid, warm environment for your shoot to thrive.
Layer Up: Air Layering Technique
🌱 Wrapping It Right: Steps to prepare for air layering
To kick off air layering, select a healthy stem—the fresher, the better. Ensure it's from the current or previous season's growth and has the girth of a sharpie. Sterilize your blade; we're not barbarians, after all. Make two parallel cuts about an inch apart around the stem and strip the bark between them. This isn't a tree massacre; be gentle but firm. Soak your sphagnum moss until it's thoroughly damp, then squeeze out the excess water like it owes you money. Dust the moss with rooting hormone—think fairy dust, but for plants. Wrap the moss pad snugly around the exposed stem, then swaddle it with clear plastic wrap. This is your plant's cocoon; make it count. Secure everything with twist ties or string, and no, this isn't the time to practice your boy scout knots.
🌿 Rooting in Mid-Air: How to ensure successful root development
Now, the waiting game begins. Monitor the moisture of your moss pad; it should feel like a wrung-out sponge—damp but not dripping. If it starts to feel like the Sahara, mist it with water. You're aiming for a mini greenhouse effect here. Patience is a virtue, and with air layering, it's mandatory. Roots may take their time, showing up in about 3 months if they're feeling punctual. When you can see a healthy root system through your makeshift greenhouse, it's time to grant independence. Cut below the new roots and pot your plant with the care of a brain surgeon. Keep it in a humid, shaded spot, and resist the urge to throw a welcome party. Your plant needs peace, not a rave. Remember, air layering is like a trust fall with Mother Nature—do it right, and she'll catch you every time.
The Perfect Propagation Pad
🌡️ Climate Control: Ideal Temperature and Humidity
Warmth and humidity are the secret sauce for Nepenthes ampullaria propagation. Aim for temperatures between 70-85°F (21-29°C) to mimic their tropical origins. Too cold and your cuttings will sulk; too hot and they might wilt. As for humidity, think rainforest, not desert—high humidity levels are a must. A plastic bag or propagation dome can create a personal sauna for your plantlets, ensuring they stay moist and happy.
🌱 Soil and Space: Choosing the Right Medium and Container
Well-draining soil is non-negotiable. Mix potting soil with perlite or sand to create a luxurious bed that's breathable yet retains enough moisture to encourage root growth. Containers should have drainage holes to avoid waterlogged roots, which are about as beneficial as a chocolate teapot. Size-wise, go cozy but not cramped; your cuttings need room to grow without drowning in too much space. Terracotta pots are a solid choice—they're like the Goldilocks of containers, providing a balance of moisture and aeration.
Overcoming Propagation Pitfalls
🌱 Common Propagation Problems
In the trenches of propagation, it's not all green pastures. Root rot is the usual suspect, often a snitch for overwatering or lousy drainage. Then there's the silent killer: fungal infections, lurking in damp corners. To combat these, air circulation is your knight in shining armor. Keep it flowing to ward off fungal freeloaders. Spotted a sickly plant part? Chop it off. Think of it as pruning the dead weight in your life.
💪 Keeping It Healthy
Pest infestations—the bane of every plant parent's existence. Mealybugs, aphids, and thrips are not just nuisances; they're full-blown home invaders. The best defense? A good offense. Keep your eyes peeled for these critters and show them the door at first sight. And cleanliness? Non-negotiable. Sterilize your tools like a surgeon and keep your propagation station as tidy as a monk's quarters. Remember, a clean start often means a healthy finish.
⚠️ Safety First
This content is for general information and may contain errors, omissions, or outdated details. It is not medical, veterinary advice, or an endorsement of therapeutic claims.
Always consult a qualified healthcare professional before using any plant as food, medicine, or supplement.
Never eat any plant (or feed one to pets) without confirming its identity with at least two trusted sources.
If you suspect poisoning, call Poison Control (800) 222-1222, the Pet Poison Helpline (800) 213-6680, or your local emergency service immediately.
Spotted an error? Please report it here.
Ensure your Nepenthes ampullaria cuttings thrive 🌿 with Greg's personalized reminders for moisture and temperature checks from these propagation tips!