Propagating Paphiopedilum venustum: The Ultimate Guide
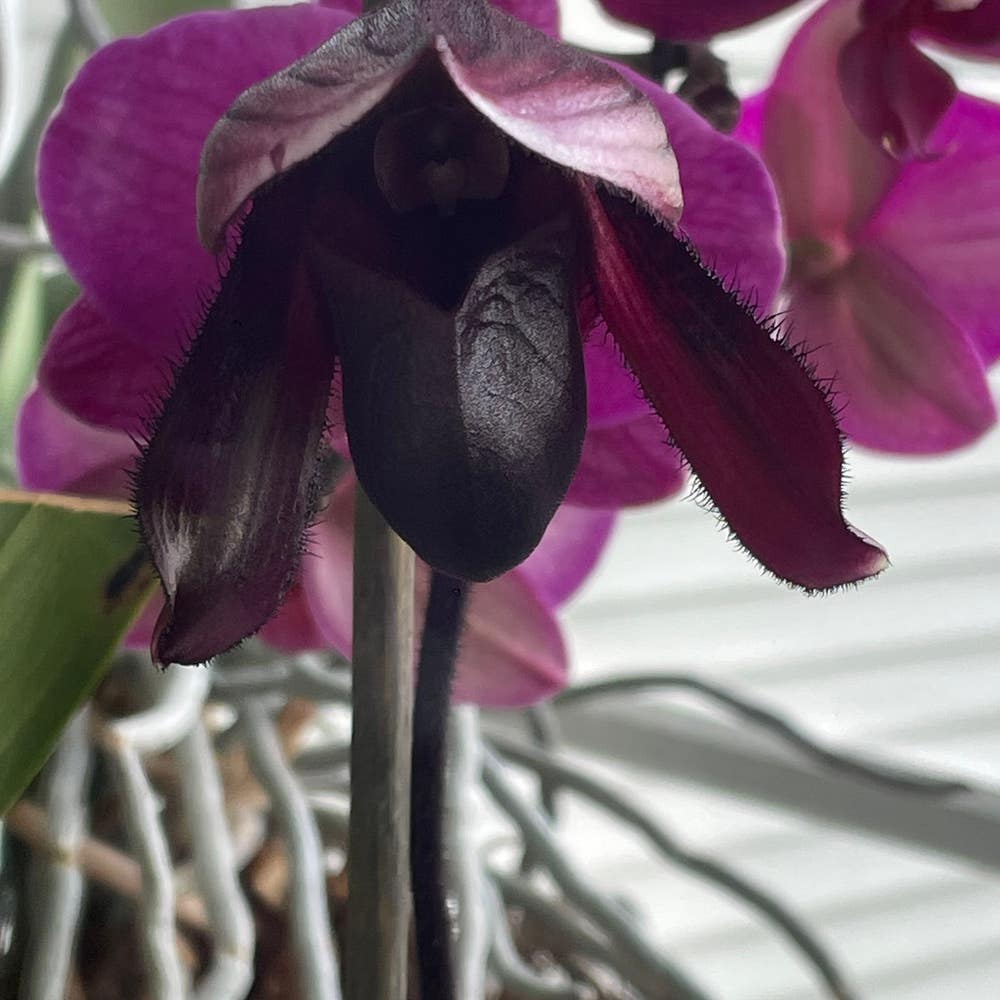
Paphiopedilum venustum
By the Greg Editorial Team
Mar 06, 2024•5 min read
This article was created with the help of AI so we can cover more plants for you. May contain errors. See one? Report it here.
- Spring division ensures success, but with care, other seasons work too.
- 🌱 Offsets and keikis are asexual clones, handle with care when separating.
- Monitor for propagation problems, like yellowing leaves or stunted growth, and intervene quickly.
Getting Started with Division
🕰️ Choosing the Right Time to Divide
Spring is the optimal time for division, tapping into Paphiopedilum venustum's natural growth cycle. Yet, if your orchid resembles a cramped city during rush hour, consider dividing outside this season, but monitor its recovery like a hawk.
The Division Process Step-by-Step
🛠 Preparing for Division
Gather your tools—sharp knife, gloves, fresh potting mix—and brace yourself for some dirt.
Dividing the Plant
Gently coax the plant from its pot. Inspect the root ball for natural divisions, and with a surgeon's precision, separate using hands or knife. Each new section must boast its own roots and shoots.
Potting Divisions
Plant each division at its original depth in a new pot with ample drainage. This prevents the dreaded root rot.
After the Split: Caring for Divided Sections
🚿 Immediate Care
Maintain consistent moisture, but avoid waterlogging. Position your plant progeny in bright, indirect light and anticipate signs of new growth, the tell-tale sign of a successful split.
Monitoring Progress
Resist the urge to fertilize until they're firmly established. Keep pests at bay with insecticidal soap or neem oil, nipping potential disasters in the bud.
Budding New Life: Offsets and Keikis
🌱 Understanding Offsets and Keikis
Offsets and keikis are natural clones of Paphiopedilum venustum, emerging as the plant's way to reproduce asexually. Offsets, also known as 'pups', sprout from the base of the plant, while keikis develop on the flower spike. Keikis are a sign of vigor, but can also indicate stress, such as overwatering or nutrient imbalance.
🌿 Encouraging Keiki Growth
To coax keikis from your Paphiopedilum venustum, balance is key. Ensure moderate temperatures and avoid over-fertilizing, as excessive nutrients can deter blooming and favor keiki formation. If you're feeling adventurous, dabbing a bit of keiki paste on a node can nudge a keiki into existence. Patience is crucial; it's a waiting game to see if leaves or blooms will emerge.
🌱 Transitioning to Independence
Once a keiki boasts several leaves and roots about 1-3 inches long, it's ready for solo life. Separate the keiki using sterilized tools to prevent infection. Plant it in a suitable medium, mimicking the mother plant's conditions. Initial care is critical; think helicopter parent until it's established. Remember, the goal is a thriving, independent orchid, not a permanent houseguest.
The Seed Propagation Challenge
🌱 Collecting and Preparing Seeds
Harvesting Paphiopedilum venustum seeds is a delicate dance with timing. Wait for the seed pods to swell but nab them before they pop. Cleanliness is non-negotiable; any debris spells disaster. Some orchid aficionados suggest a quick soak to nudge seeds from their slumber—research if this applies to your Paph.
🌱 Sowing and Germinating Orchid Seeds
Sowing these seeds isn't a sprinkle-and-forget affair. Surface sow them; they crave light to kickstart germination. Think of it as setting the stage for a microscopic show. Then, patience is your virtue—orchid seeds test your endurance. Keep conditions sterile; these seeds are prone to fungal gatecrashers. Germination takes time, but the wait can unveil a new generation of botanical wonders.
Nurturing Your Propagated Orchids
💡 Creating the Perfect Environment
To thrive, your Paphiopedilum venustum orchids need a Goldilocks zone of conditions. Temperature is critical; aim for a warm 70-80°F during the day, with a slight drop at night to mimic their natural habitat. Humidity should hover around 40-70%, so consider a humidifier if your air is drier than a stand-up comedian's wit. Light is another key player; these orchids prefer bright, indirect sunlight. Direct rays are a no-go unless you fancy orchid jerky.
🏃 Transitioning to the Big World
Moving your orchids to their permanent home isn't a sprint; it's a marathon with a leisurely pace. Start by acclimating them to the new environment gradually. A sudden change is like a cold shower – shocking and unpleasant. Introduce them to their new digs over a few weeks, slowly adjusting light and temperature. Keep a vigilant eye on their response; it's the best indicator of whether your care is hitting the mark or missing it by a mile.
Overcoming Propagation Pitfalls
🚨 Identifying Common Propagation Problems
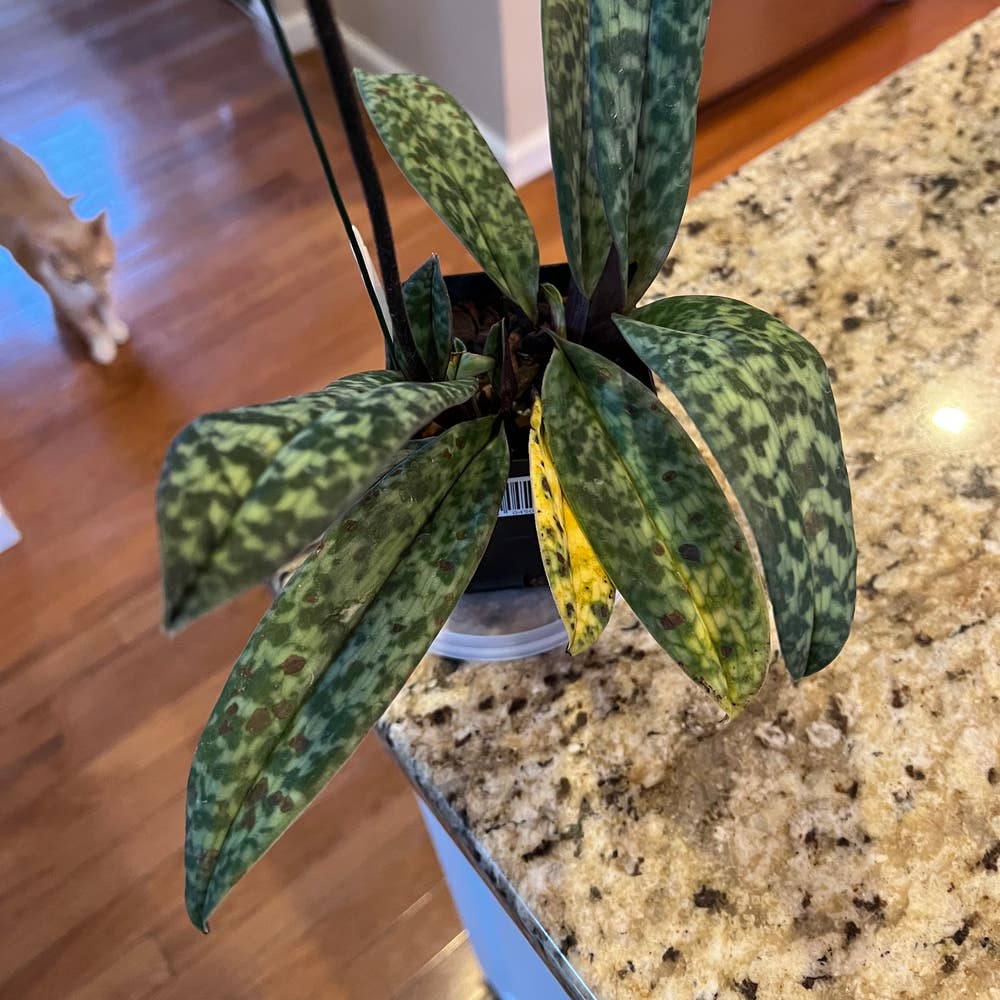
Yellowing leaves or a sudden halt in growth are your first clues that something's amiss. It's like your plant is sending an SOS; ignore it at your own peril.
🛠️ Solutions and Preventative Measures
🌱 Addressing Root Rot and Over-watering
Root rot is the silent killer in the propagation game. If your plant's roots look like overcooked noodles, it's time to take action. Trim the gunk, let the roots air out, and repot with well-draining soil. Over-watering? That's a no-go. Keep the soil moist, not soggy, and make sure your pots have drainage holes to avoid waterlogged roots.
🍄 Fungal Infections and Pest Control
Gray mold and powdery mildew are like party crashers. Good airflow and a fungicide can show these fungi the door. Pests? Act fast. They're not just annoying; they're a threat to your plant's very existence.
🌿 Encouraging Healthy Growth
If your propagation efforts are more tortoise than hare, reassess your light and nutrient game. Sometimes, a little extra sunshine or a nutrient kick is all it takes to get things moving.
👀 Keeping a Watchful Eye
Propagation is not set-it-and-forget-it. It's more like babysitting a toddler with a penchant for trouble. Keep a vigilant watch for any signs of distress and be ready to intervene with the precision of a ninja.
Remember, every setback is a lesson in disguise. Embrace the challenges, and you'll come out a propagation guru.
⚠️ Safety First
This content is for general information and may contain errors, omissions, or outdated details. It is not medical, veterinary advice, or an endorsement of therapeutic claims.
Always consult a qualified healthcare professional before using any plant as food, medicine, or supplement.
Never eat any plant (or feed one to pets) without confirming its identity with at least two trusted sources.
If you suspect poisoning, call Poison Control (800) 222-1222, the Pet Poison Helpline (800) 213-6680, or your local emergency service immediately.
Spotted an error? Please report it here.
Successfully propagate your Paphiopedilum venustum by following our guide, and count on Greg's tailored reminders 🌱 to keep your orchid divisions perfectly watered and healthy.