Plant Care
›
Propagation
›
Horse-Apple
Maclura pomifera
Reviewed by Kiersten Rankel M.S.
QUICK ANSWER
Seed propagation is the most reliable home method and produces seedlings in 4 to 8 weeks after a 30 to 90 day cold stratification. Hardwood cuttings root over the winter from dormant wood collected in late autumn but only succeed about half the time.
Root cuttings taken in early spring sprout new shoots in 4 to 6 weeks and pass on the parent's exact traits, which seeds do not.
Root cuttings taken in early spring sprout new shoots in 4 to 6 weeks and pass on the parent's exact traits, which seeds do not.
Stay on top of plant care
Get seasonal reminders for watering and fertilizing, personalized for your plants.
Try Greg Free
Pick your method
Tap one to jump to the walkthrough.
From seed
Best for growing many trees from a single fall harvest
Hardwood cuttings
Best for cloning a thornless or favorite parent tree
Root cuttings
Best for cloning a parent tree without losing a season
From seed
Time
30–90 days strat + 4–8 weeks
Level
Beginner
Success rate
High
You'll need
Ripe Osage Orange fruits (collected after they fall)
Bucket and 5-gallon of water for fruit breakdown
Coarse sandpaper or a file for scarification
Damp sand or perlite plus a sealed bag for cold stratification
4-inch deep pots with drainage and seed-starting mix
Bright light or south-facing window
1
Collect and break down the fruit
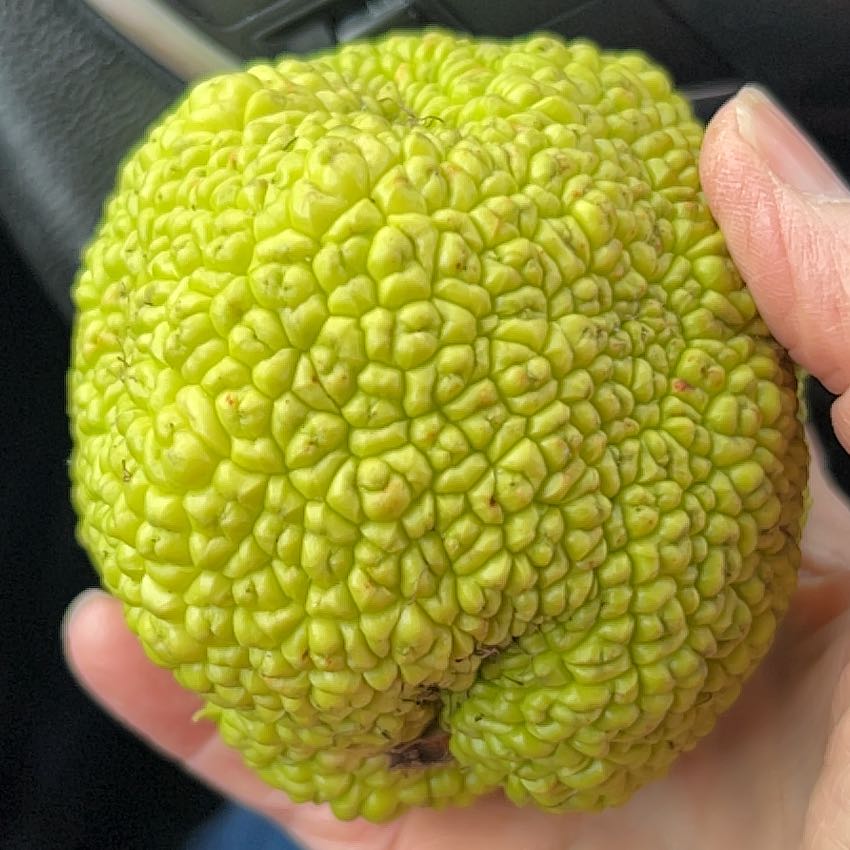
Gather the bumpy green fruits after they drop in October or November. Drop them in a bucket of water and let them sit for 2 to 4 weeks until the flesh softens and falls apart.
The seeds are buried inside the pulp, about 200 to 300 per fruit. Stir or mash the softened fruit by hand to release them, then rinse the seeds clean in a colander.
The seeds are buried inside the pulp, about 200 to 300 per fruit. Stir or mash the softened fruit by hand to release them, then rinse the seeds clean in a colander.
2
Scarify the seed coat
Each seed has a hard tan shell that blocks water until weathering breaks it down. Rub each seed lightly with sandpaper until the coat looks scuffed but not cracked, or nick one edge with a file. This shortens germination from months to weeks.
3
Cold stratify for 30 to 90 days
Mix the scarified seeds with damp sand or perlite, seal in a labeled plastic bag, and refrigerate at 35 to 40 F. Check every 2 weeks for mold and re-dampen if the medium dries out.
Osage Orange seeds need this chilling period to break dormancy. Most batches germinate after 30 to 45 days, but 90 days is safer for fully reliable sprouting.
Osage Orange seeds need this chilling period to break dormancy. Most batches germinate after 30 to 45 days, but 90 days is safer for fully reliable sprouting.
4
Sow in deep pots
Fill 4-inch deep pots with seed-starting mix and sow seeds half an inch deep, one or two per pot. Use deep pots because Osage Orange forms a long taproot fast and a shallow tray will stunt the seedlings within weeks.
5
Keep warm and bright
Place pots somewhere that stays 70 to 80 F and gets bright light. Seedlings push through in 2 to 4 weeks once the cold treatment is finished. Water when the top inch of mix dries out, never let pots sit wet.
6
Pot up or plant out
Once seedlings reach 6 to 12 inches with several true leaves, move them to 1-gallon pots or directly to a permanent outdoor spot in spring. Choose the spot carefully because the taproot makes transplanting older trees nearly impossible.
Seed-grown Osage Orange has thorns and the sex of each tree won't be known for 8 to 10 years until flowering.
Seed-grown Osage Orange has thorns and the sex of each tree won't be known for 8 to 10 years until flowering.
WATCH FOR
Seeds that swell but never sprout after 6 weeks at warm temperatures. The cold stratification was too short or the seed coat was not scuffed enough. Pull a few seeds, scarify more aggressively, give them another 30 days in the refrigerator, and try again. Fresh seed from the current year's fruit germinates far better than seed stored more than a year.
Hardwood cuttings
Time
12–16 weeks
Level
Intermediate
Success rate
Moderate
You'll need
Sterile bypass pruners
Pencil-thick dormant wood from the previous season's growth
Rooting hormone powder (recommended)
Deep nursery pots or a prepared outdoor nursery bed
Coarse sand mixed with perlite for the rooting medium
Mulch or row cover for winter protection
1
Cut wood in late autumn
Wait until the parent tree drops its leaves and goes fully dormant, usually November to early January. Choose pencil-thick wood from the previous summer's growth, not older gray bark.
Take long sections from healthy outer branches. Avoid weak interior shoots and any wood with cracked bark.
Take long sections from healthy outer branches. Avoid weak interior shoots and any wood with cracked bark.
2
Cut 6 to 12 inch pieces
Use sterile bypass pruners to cut 6 to 12 inch lengths. Make a flat cut just below a bud at the bottom and an angled cut above a bud at the top. The angled cut sheds water and helps you keep track of which end goes down.
3
Dip in rooting hormone
Tap the bottom inch into rooting hormone powder and shake off the excess. Osage Orange roots from hardwood at moderate rates without hormone, but powder pushes the success rate from around 30 percent up to 50 or 60 percent.
4
Stick in coarse rooting medium
Push cuttings two-thirds of their length into a 50-50 mix of coarse sand and perlite, leaving the top two buds above the surface. Space them 3 inches apart. Water once to settle the medium around the wood.
5
Overwinter cool and protected
Keep the pots or bed somewhere that stays cold but not freezing solid, between 30 and 45 F. An unheated garage, cold frame, or sheltered north-facing wall works well.
Cover with a 2-inch layer of mulch or row cover. The cuttings need this dormant chill to callus before pushing roots in spring.
Cover with a 2-inch layer of mulch or row cover. The cuttings need this dormant chill to callus before pushing roots in spring.
6
Move out in spring
By April or May new buds will swell and small leaves emerge. Tug gently, resistance means roots have anchored. Move rooted cuttings to 1-gallon pots or a nursery row and grow on for one full season before final planting.
WATCH FOR
Cuttings that leaf out in early spring then collapse a few weeks later. The top buds pushed using stored energy in the wood but no roots ever formed below. This usually means the cuttings were taken from wood that was too old or too thin, or the rooting medium stayed too wet during dormancy. Discard collapsed cuttings and try again next winter with pencil-thick wood from the most recent growing season.
Root cuttings
Time
4–6 weeks
Level
Intermediate
Success rate
High
You'll need
Sharp spade or trowel
Sterile pruners
Pencil-thick root sections, 4 to 6 inches long
Flats or 4-inch pots with a sandy seed-starting mix
Plant labels and a marker for tracking root orientation
Bright shade location
1
Dig roots in early spring
Wait until the ground thaws but before the parent tree pushes new leaves, usually March or early April. Dig 12 to 18 inches out from the trunk to find roots about pencil-thick.
This timing matches the surge of stored energy in the roots and gives the cuttings the longest possible growing season ahead.
This timing matches the surge of stored energy in the roots and gives the cuttings the longest possible growing season ahead.
2
Cut 4 to 6 inch sections
Wash the dirt off and use sterile pruners to cut sections 4 to 6 inches long. Make a flat cut at the end closest to the trunk and an angled cut at the far end. Keeping orientation correct matters because root cuttings will not sprout if planted upside down.
3
Plant horizontally or vertically
Lay sections horizontally in a tray, half an inch deep in sandy seed-starting mix, or push them vertically into pots with the flat-cut end up just at the soil surface.
Horizontal planting is more forgiving for beginners because orientation does not matter. Vertical planting roots a little faster.
Horizontal planting is more forgiving for beginners because orientation does not matter. Vertical planting roots a little faster.
4
Water and place in bright shade
Water lightly to settle the mix and keep the medium just barely moist, never wet. Put the tray somewhere that gets bright indirect light at 60 to 70 F. Direct sun dries out the cuttings before shoots emerge.
5
Wait for shoots to emerge
New green shoots push up through the soil in 4 to 6 weeks. Once shoots are 2 to 3 inches tall and have a few leaves, the section below has formed feeder roots and the new plant is established.
6
Pot up and grow on
Move each rooted shoot into a deep 1-gallon pot with regular potting mix. Grow in bright shade for the rest of the first season, then transition to full sun the next spring before planting in a permanent spot.
WATCH FOR
Sections that sit for more than 8 weeks without sending up any shoots. The most common cause is upside-down planting on vertical sections, with the trunk-side cut buried instead of pointed up. The second cause is rot from a wet medium. Lift a few sections to check, replant any healthy ones with the correct orientation in barely damp sandy mix, and discard any that smell sour or feel mushy.
Stay on top of plant care
Get seasonal reminders for watering and fertilizing, personalized for your plants.
Try Greg Free
About This Article

Kiersten Rankel M.S.
Botanical Data Lead at Greg · Plant Scientist
Editorial Process
Propagation methods verified against Maclura pomifera growth data from Greg's botanical database, cross-referenced with USDA hardiness zone data and published horticultural research.
91+ Greg users growing this plant
USDA hardiness zones 4a–9a