Plant Care
›
Propagation
›
False Indigo
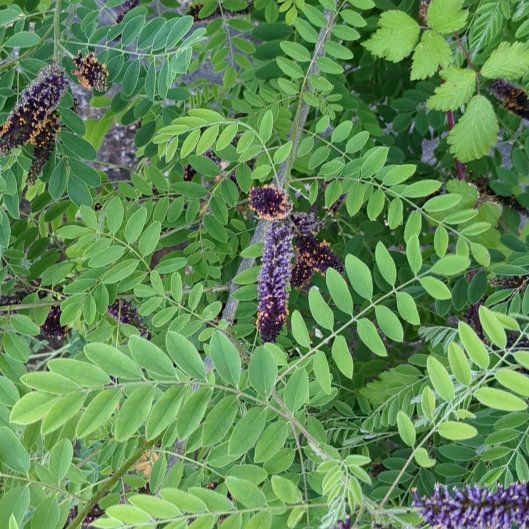
Amorpha fruticosa
Reviewed by Kiersten Rankel M.S.
QUICK ANSWER
Scarified seed sown in spring is the most reliable method and gives plantable shrubs in one season.
Hardwood cuttings taken in late winter root over 8 to 12 weeks at moderate success rates. Softwood cuttings in June need bottom heat to root within a month. Root cuttings dug in early spring sprout new shoots within 6 weeks and are the fastest way to clone a specific plant.
Hardwood cuttings taken in late winter root over 8 to 12 weeks at moderate success rates. Softwood cuttings in June need bottom heat to root within a month. Root cuttings dug in early spring sprout new shoots within 6 weeks and are the fastest way to clone a specific plant.
Stay on top of plant care
Get seasonal reminders for watering and fertilizing, personalized for your plants.
Try Greg Free
Pick your method
Tap one to jump to the walkthrough.
From seed
Best for filling a meadow or restoration site
Hardwood cuttings
Best for cloning a specific shrub in winter
Softwood cuttings
Best for fast cloning during the growing season
Root cuttings
Best for the fastest clone of an established shrub
From seed
Time
2–4 weeks germination
Level
Beginner
Success rate
High
You'll need
Dry seed pods collected in fall
Sandpaper or a small file
Bowl of warm water
Seed trays with seed-starting mix
Bright indirect light or a south window
1
Harvest mature pods
Collect the curved brown pods in October or November after they have dried on the plant. Each pod holds one or two hard, glossy seeds. Crack the pods open over a paper plate and pick the seeds out.
2
Scarify the seed coat
False Indigo seed has an iron-hard coat that water cannot penetrate without help. Rub each seed lightly on sandpaper until you can see the pale inner layer through a small worn patch.
Do not file all the way through. You only need to break the waterproof outer layer.
Do not file all the way through. You only need to break the waterproof outer layer.
3
Soak overnight
Drop scarified seeds into a bowl of warm tap water and leave for 24 hours. Viable seeds swell to about double their original size. Discard any that stay shriveled because the scarification did not take.
4
Sow indoors in early spring
Push each swollen seed half an inch deep into damp seed-starting mix in a deep tray or 4-inch pots. Cover lightly. Water from below to settle the soil.
5
Keep at room temperature
Set the tray in bright indirect light at 65 to 75 degrees. Germination starts within 10 days and runs through the third week. Water when the surface dries.
6
Pot on at 4 inches tall
Once seedlings have 4 true leaves, lift them into 1-gallon pots of well-draining soil. False Indigo grows fast and resents being pot-bound. Plant out after the last frost when seedlings are at least 8 inches tall.
WATCH FOR
No germination after 3 weeks even though seeds soaked up water. The scarification was too gentle and the seed coat is still intact. Re-scarify the unsprouted seeds, soak again, and resow. Seed coats that look uniformly hard and shiny need another pass with the sandpaper.
Hardwood cuttings
Time
8–12 weeks
Level
Intermediate
Success rate
Moderate
You'll need
Sterile pruners
Rooting hormone (recommended)
Deep nursery pots or a sand-filled trench
Coarse sand or perlite-soil mix
Mulch
1
Take cuttings in late winter
Cut 8 to 10-inch sections of pencil-thick wood from the previous year's growth in February before buds swell. Each cutting needs 3 to 4 nodes. Make the bottom cut just below a node and the top cut a half inch above one.
2
Mark which end is up
Cut the bottom flat and the top at a slight angle so you cannot accidentally plant the cutting upside down. Hardwood cuttings stuck wrong-side-up never root.
Do this even if you think you will remember which end is which. You will not.
Do this even if you think you will remember which end is which. You will not.
3
Dust with rooting hormone
Tap the bottom inch of each cutting in rooting hormone powder. False Indigo roots adequately without hormone, but hormone bumps success from about 50 percent to 70 percent. Shake off the excess before planting.
4
Plant in sand-filled trench or deep pot
Push cuttings into a sand-filled trench or deep nursery pot so two-thirds of each is buried. Space cuttings 4 inches apart. Firm the medium around them and water in.
5
Mulch and overwinter
Cover the cuttings with 3 inches of mulch and leave them outdoors. Cold dormancy is essential. Indoor heat at this stage forces top growth before roots form and the cutting dies.
6
Lift in late spring
By May, rooted cuttings have leafed out and a tug shows resistance. Lift them carefully with a fork, pot up into 1-gallon containers, and grow on for one season before planting out the following spring.
WATCH FOR
Cuttings push leaves in early spring but collapse by June. That is top growth without supporting roots. Hardwood cuttings prioritize leaves before roots if temperatures spike too fast. Mulch heavily and provide afternoon shade through the first warm spell. Cuttings that have rooted properly hold their leaves through summer heat.
Softwood cuttings
Time
4–6 weeks
Level
Intermediate
Success rate
Moderate
You'll need
Sterile pruners
Rooting hormone powder
4-inch pots with drainage
Perlite and peat mix
Clear humidity dome
Bottom heat mat
1
Cut in early summer
Take 5-inch tip cuttings in June from new growth that snaps cleanly when bent sharply. Each cutting needs 3 leaf nodes. Strip leaves from the lower two nodes.
2
Reduce leaf surface
Cut the remaining leaflets in half across to reduce water loss. False Indigo has compound leaves with many leaflets and unmodified cuttings wilt before they can root.
Dip the bottom inch in rooting hormone immediately after the cut to prevent the wound from sealing dry.
Dip the bottom inch in rooting hormone immediately after the cut to prevent the wound from sealing dry.
3
Stick in perlite-peat mix
Push each cutting 2 inches deep into damp perlite-peat mix in a 4-inch pot. Three cuttings per pot. Firm the mix and water from below.
4
Cover and provide bottom heat
Set the pot inside a clear dome and place on a heat mat at 75 degrees. False Indigo softwood cuttings need warm bottoms and humid tops or they fail. Bright indirect light, no direct sun.
5
Vent the dome at week 3
Lift the dome for 30 minutes each day starting at week 3 to acclimate cuttings to lower humidity. Increase the venting time over the next 2 weeks until the dome can come off entirely.
6
Pot up at week 6
Tug-test each cutting. Rooted ones resist gentle pulling. Lift carefully and pot up into 1-quart pots. Grow on indoors or in a sheltered spot until the following spring.
WATCH FOR
The cutting wilts and the leaves crisp within the first week even with the dome on. That is a sign the cutting was taken from wood that was too soft and immature. Take new cuttings from slightly firmer wood, recut bottom ends fresh, and try again. Cuttings that survive the first 7 days usually go on to root.
Root cuttings
Time
6–10 weeks
Level
Intermediate
Success rate
High
You'll need
Sharp spade
Sterile knife
4-inch pots
Sandy potting mix
A cold frame or sheltered outdoor spot
1
Dig in early spring
In March before the shrub leafs out, dig 8 inches down and 12 inches out from the trunk of an established False Indigo. Find the lateral roots, which are pencil-thick and run horizontally just below the surface.
2
Cut 3-inch sections
Sever a few healthy roots from the parent and cut each one into 3-inch sections. Make the top cut flat and the bottom cut at an angle so you can tell orientation later.
Replace the soil around the parent and water it in. The shrub will not miss a few root pieces.
Replace the soil around the parent and water it in. The shrub will not miss a few root pieces.
3
Stick vertically in pots
Fill 4-inch pots with sandy potting mix. Push each root section in vertically with the flat top end at soil level and the angled end pointing down. Cover the top with a quarter inch of mix.
4
Water lightly and place outdoors
Soak each pot once and set in a cold frame or sheltered outdoor spot. Bottom heat is not needed because the spring soil temperatures handle root cuttings naturally. Do not water again until shoots appear.
5
Wait for shoots
New green shoots push from the buried top end of each root section within 6 to 8 weeks. Once shoots are 3 inches tall, the section has also grown new feeder roots and the cutting is established.
6
Pot up in summer
By July, lift each rooted section into a 1-gallon pot of standard potting soil. Grow on through the first season and plant out the following spring. Root cuttings produce vigorous shrubs that flower in their second year.
WATCH FOR
Root sections rot before any shoot appears. That means the soil stayed too wet during the cool dormant phase. Sandy mix and minimal watering until shoots emerge are critical. If a section feels mushy when pulled, it is dead. Discard it and try again next spring with cleaner pots and grittier mix.
Stay on top of plant care
Get seasonal reminders for watering and fertilizing, personalized for your plants.
Try Greg Free
About This Article

Kiersten Rankel M.S.
Botanical Data Lead at Greg · Plant Scientist
Editorial Process
Propagation methods verified against Amorpha fruticosa growth data from Greg's botanical database, cross-referenced with USDA hardiness zone data and published horticultural research.
42+ Greg users growing this plant
USDA hardiness zones 4a–9b