How to Grow a Big Boy Tomato
Plant Big Boy Tomato in full sun, in deep loamy soil enriched with compost, 2 to 3 feet apart on a sturdy 5 to 6 foot cage or stake. Bury the stem deeply up to the first true leaves so it roots along the buried portion, water consistently at the base, prune suckers weekly, and harvest 75 days from transplant.
Container vs garden bed
Big Boy Tomato grows well in either a deep garden bed or a roomy container, both with their own trade-offs. The decision usually comes down to space, soil quality, and how often you can water.
Garden bed
A garden bed gives the plant more root volume, steadier soil moisture, and the easiest path to a heavy yield. Big Boy is a vigorous indeterminate that grows 6 to 8 feet tall and 3 feet wide, with heavy bearing all season once it gets going. The bed needs at least 18 inches of loose loamy soil amended with several inches of compost.
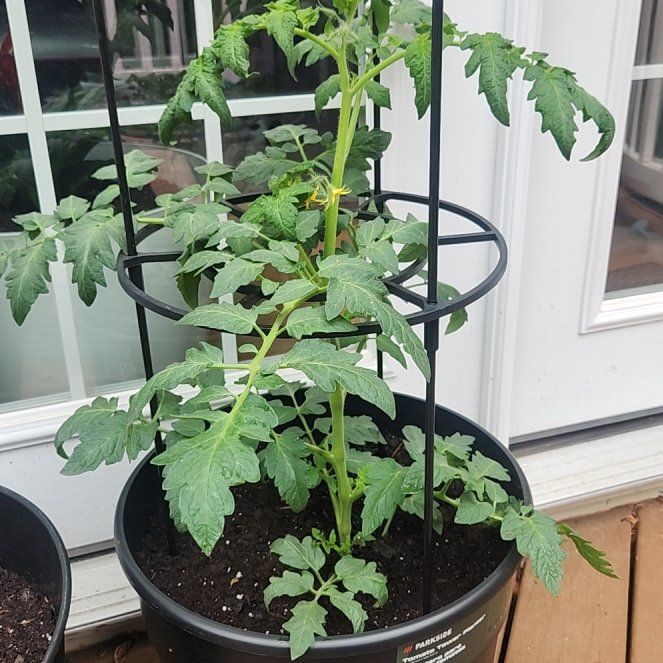
Pot
A pot works well when the yard soil is poor or garden space is tight. Use a container at least 18 to 24 inches across and 18 inches deep per plant, with drainage holes at the base. Fill with a high-quality potting mix rather than dense garden soil, which compacts in a container.
Container tomatoes dry out fast in summer and need watering every day or even twice a day in hot weather. Yield from a single container is typically half what an in-ground plant produces. A self-watering container with a reservoir helps a lot.
Where to plant
Big Boy Tomato is a warm-season annual that needs a long stretch of heat to ripen its large fruit. Plant after all danger of frost has passed and night temperatures stay above 50 degrees.
Sun
Full sun, with at least 6 to 8 hours of direct light each day. Anything less reduces fruit set and slows ripening. The hottest sunniest spot in the yard usually grows the best tomatoes.
Drainage
Big Boy needs well-drained soil. Standing water rots roots within a few days. Dig a one-foot test hole and fill with water. If it drains within a few hours, the spot works. If water sits overnight, build a raised bed 8 to 12 inches above grade or move the plant to a better-draining spot.
Soil
Loose loamy soil enriched with several inches of compost before planting is ideal. Slightly acidic conditions suit the plant well. Heavy clay benefits from compost and a raised bed for drainage, and very sandy soil benefits from compost to hold moisture and nutrients through the long season.
Crop rotation
Rotate tomatoes out of beds that grew other nightshades in the last two years. Pepper, eggplant, potato, and tomatillo share the same soil-borne diseases (early blight, late blight, fusarium wilt, verticillium wilt). Back-to-back nightshade planting builds up these pathogens to crop-killing levels.
How to plant
Transplant young plants outdoors after all danger of frost has passed and nighttime lows stay above 50 degrees. In most climates that means mid May to early June. Harden off greenhouse-grown plants by setting them outside in a sheltered spot for 1 to 2 hours a day, gradually increasing exposure over a week before transplanting.
-
1Dig a deep planting hole Dig a hole 12 to 18 inches deep, much deeper than the seedling needs at first glance. Tomatoes are unique in that buried stems form new roots along the entire buried length, which gives the plant a much larger root system and faster early growth.
-
2Strip the lower leaves and bury deeply Pinch off all leaves on the lower two thirds of the seedling stem. Set the plant in the hole so that only the top set of leaves sits above soil level. The buried portion of stem will sprout roots within a few weeks.
-
3Backfill with native soil and compost Mix a few handfuls of compost into the dug-out soil and refill the hole, firming gently as you go. A small handful of bone meal in the planting hole supports root development and discourages blossom-end rot later in the season.
-
4Install the cage or stake at planting Set a sturdy 5 to 6 foot tomato cage over the plant or drive a 6-foot stake into the soil a few inches from the stem. Installing support after the plant is large damages roots and disturbs the plant. Big Boy gets too tall and heavy for the flimsy conical store cages by midsummer.
-
5Water deeply and mulch Soak the root zone thoroughly until the soil settles around the deeply buried stem. Apply 2 to 3 inches of straw, shredded leaf, or grass-clipping mulch around the plant, kept a few inches back from the stem. Mulch keeps soil moisture even and reduces disease splash from rain hitting the soil.
Watering and feeding
Watering
Water deeply once or twice a week, applying about an inch of water at the base of each plant. Drip lines or a soaker hose work best. Avoid splashing water on the leaves, which spreads early blight and other fungal diseases.
Consistency is the key to avoiding blossom-end rot and split fruit. Wet-dry-wet swings cause the developing fruit to crack across the shoulders and to develop sunken dark spots on the blossom end. A two-to-three-inch mulch layer evens out moisture between waterings and is one of the highest-impact things you can do.
Container plants dry out faster than bed-grown plants and need daily watering through hot weather, sometimes twice a day in heat above 90 degrees.
Feeding
Feed every 2 to 3 weeks starting once flowers appear, using a tomato-specific fertilizer or a balanced fertilizer with a slight emphasis on potassium and phosphorus. A side-dressing of compost a few weeks after planting also supports steady growth.
Avoid heavy nitrogen, which produces lush dark leaves and few flowers. Once the plant is loaded with fruit, switch entirely to a low-nitrogen tomato food until the end of the season.
Pruning and support
Big Boy is an indeterminate tomato, meaning the vines grow and produce fruit continuously from midsummer until frost rather than ripening all at once. The vines need ongoing support and steady pruning to keep airflow, manage size, and direct energy toward fruit rather than excess foliage.
Tying and supporting
Tie the main stem (or two or three main stems) loosely to the cage or stake every 8 to 12 inches as it grows, using soft twine or stretchy plant tape. Avoid wire or zip ties that cut into the stem as it expands. Loose figure-8 ties around the stem and the support give the plant room to thicken without girdling.
Suckering
Suckers are the small shoots that emerge from the V where a leaf branch meets the main stem. Pinch them off weekly with your fingers when they are small (under a couple of inches). Unmanaged suckers turn into full vines, producing a tangled bush with smaller fruit and worse airflow.
Most growers train Big Boy to one or two main stems, removing all other suckers. Leaving two stems doubles the fruit count slightly at the cost of slightly smaller fruit per truss. Either system works.
Removing lower leaves
As the plant grows tall through summer, snip off the bottom 12 inches of leaves once they yellow or start to spot. Lower-leaf removal improves airflow, slows the spread of soil-splashed fungal disease, and helps direct energy upward to the developing fruit.
Topping at the end of the season
Roughly 4 to 6 weeks before the first expected fall frost, pinch off the growing tip of each main stem. This stops new growth and directs the plant's energy into ripening the fruit already on the vine. Any flowers or very small fruit that appear after topping will not have time to ripen before frost.
Harvest
Big Boy produces large red beefsteak-style tomatoes weighing 10 to 16 ounces each, with the first ripe fruit roughly 75 days from transplant. Once production starts, expect 20 to 30 pounds of fruit per plant over the season under good conditions.
When it's ready
Pick when the fruit is fully red but still firm to a gentle squeeze. Ripe Big Boy tomatoes pull off the vine with a light twist at the point where the fruit meets the stem. Underripe fruit is firm and pale orange-red and clings tightly. Overripe fruit feels soft and bruises easily.
If the weather forecast calls for a heavy rain after a dry spell, pick fully red fruit before the rain hits to avoid cracking. Almost-ripe fruit ripens fine on a kitchen counter and avoids the loss to cracking and rot.
Picking and storing
Hold the fruit and twist gently sideways until the stem snaps at the natural joint near the calyx. Drop into a shallow basket or container only a few inches deep so the fruit does not crush itself with its own weight.
Store ripe tomatoes on the counter at room temperature, never the refrigerator. Cold ruins the flavor and texture by breaking down the cell walls. Fully ripe fruit holds 3 to 5 days at room temperature. Underripe fruit ripens on the counter in a few days.
End-of-season green tomatoes
Before the first hard frost, pick all green tomatoes that are at least the size of a golf ball and have started to turn from dark green to a paler color. Wrap each in newspaper and store in a single layer in a cool dry spot. Most ripen over the following 2 to 4 weeks. Truly small immature fruit will not ripen and is best used green (fried, pickled, or in chutney).
Common problems and pests
Most Big Boy Tomato problems trace to either watering inconsistency or to common nightshade diseases. Steady watering, mulching, and crop rotation prevent most issues from taking hold.
Sunken black spot on the blossom end
Blossom-end rot, caused by inconsistent watering that disrupts calcium uptake (not by low soil calcium itself). Mulch the root zone two to three inches deep and water deeply on a steady schedule. The first few fruits of the season are most affected. Later fruit usually comes in clean once the watering rhythm is consistent.
Cracking across the shoulders
Caused by a sudden surge of water (heavy rain or deep soak) after a dry stretch, which makes the fruit swell faster than the skin can stretch. Mulch the bed and water evenly through the season. Pick almost-ripe fruit before forecasted heavy rain.
Yellowing lower leaves with brown bullseye spots
Early blight, a soil-splash fungal disease that starts on lower leaves and progresses upward. Remove affected leaves immediately, mulch heavily to stop further splash, and water at the base rather than overhead. Severe outbreaks respond to a copper-based fungicide. Rotate out of nightshade beds for 2 to 3 years.
Water-soaked dark patches on leaves and stem
Late blight, a much faster-moving fungal disease than early blight. Patches spread within days and can kill the plant in a week, especially in cool damp weather. There is no cure once the plant is heavily infected. Pull and bag the entire plant to prevent spread to neighboring plants and remove debris from the bed.
Large green caterpillars stripping leaves and fruit
Tomato hornworms, large green caterpillars 3 to 4 inches long with a horn-like tail. Hand-pick them into soapy water in the morning when they are sluggish, or spray with Bt (Bacillus thuringiensis), which kills caterpillars without harming bees. Hornworms with white rice-like cocoons on their backs are parasitized and should be left in place to hatch beneficial wasps.
Holes in fruit
Often tomato fruitworm (corn earworm) or birds. Fruitworms tunnel into developing fruit and leave dark frass. Pick and discard affected fruit and treat the plant with Bt. Bird damage is shallow and irregular, so drape lightweight netting over the cages once fruit starts to color.
Curling or distorted new leaves
Often herbicide drift from nearby lawn weed killers, especially 2,4-D, which moves on the breeze and damages tomatoes at very low doses. Plants usually outgrow light exposure but heavy exposure may not recover. Other causes include broad mites and tomato spotted wilt virus, both less common.
Wilting whole plant on a hot day
Midday wilt that recovers by morning is normal and rarely a problem. Persistent wilt that does not recover overnight points to fusarium or verticillium wilt (both incurable soil-borne diseases) or bacterial wilt. Pull affected plants and rotate out of the bed for at least 3 years. Big Boy carries some resistance to verticillium and fusarium, but heavy soil pressure overcomes it.
Few flowers or fruit set
Usually caused by excess nitrogen feeding (lush green growth without flowers), nighttime temperatures above 75 or below 55 degrees (poor pollination), or insufficient sun. Switch to a low-nitrogen tomato fertilizer and accept that very hot midsummer stretches reduce fruit set until cooler weather returns.
Yellow shoulders on otherwise ripe fruit
Hard yellow patches that never turn red on the upper shoulders of the fruit, caused by direct hot afternoon sun on developing fruit (sunscald) or potassium deficiency. Leave more leaf cover around the developing fruit during pruning and side-dress with a balanced potassium-rich fertilizer.
About This Article
