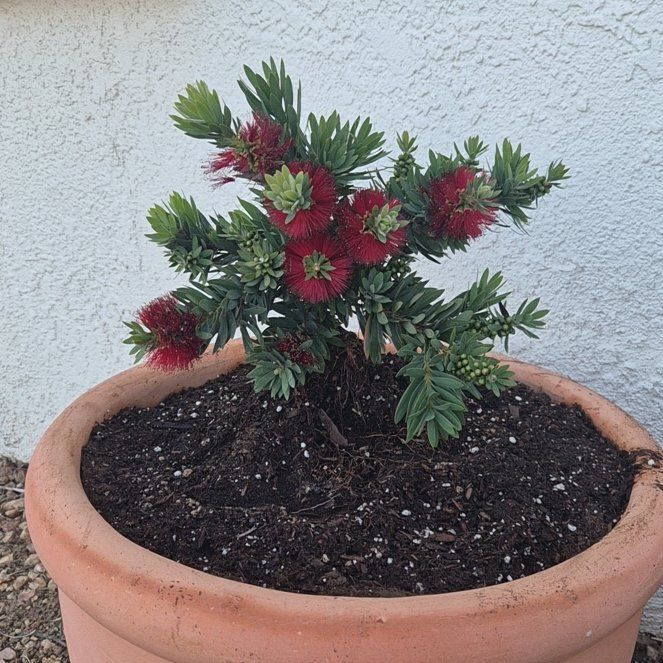
How to Grow a Little John Dwarf Bottlebrush
Plant Little John Dwarf Bottlebrush in full sun, in free-draining soil, and give each shrub about 3 feet of clear space. The compact form stays roughly 3 feet tall and wide. Red bottlebrush flowers appear in flushes from spring through summer. The plant is hardy in USDA zones 8 to 11 and drought-tolerant once established.

Where to plant
Little John Dwarf Bottlebrush is a compact evergreen shrub grown for its red bottlebrush-shaped flowers and dense year-round foliage. The plant is hardy in USDA zones 8 to 11 and matures to about 3 feet tall and 3 to 5 feet wide. Its small size suits foundation plantings, low hedges, and large containers.
Sun
Six to eight hours of direct sun produces the densest foliage and the heaviest bloom. The shrub tolerates light afternoon shade and grows in it, but flowering drops noticeably in less than five hours of direct sun. A spot with all-day sun usually works best.
Drainage
Free-draining soil is essential. Roots in soggy soil rot quickly. Dig a one-foot test hole and fill it with water. If it drains within a few hours, the spot is fine. If water sits overnight, build a raised mound 8 to 12 inches above grade and plant on top of it.
Soil
Little John tolerates a wide range of soils, from sandy and slightly acidic to loamy and neutral. It prefers slightly acidic to neutral conditions and shows iron deficiency on heavily alkaline soil. Work a few inches of compost into the planting area to start the shrub off, especially in poor sandy or clay-heavy ground.
Space
Space individual plants 3 to 4 feet apart for a low informal hedge or about 4 feet apart in a mixed bed where each plant stands as its own focal point. The dense compact form fills its space quickly without crowding neighbors as long as the spacing is honored at planting.
How to plant
Plant container-grown Little John in spring after the last frost or in early fall at least six weeks before the first hard frost. Container-grown shrubs can go in any time during the growing season, but new roots establish fastest in cool weather.
-
1Dig a wide shallow hole Twice as wide as the root ball but only as deep. The roots spread sideways more than down, so a wide hole helps establishment more than a deep one.
-
2Loosen the root ball If the roots are circling tightly inside the nursery pot, gently tease them apart or score the outside with a knife. Circling roots stay circling unless you break the pattern, even after the shrub is in the ground.
-
3Set the shrub slightly high The top of the root ball should sit about an inch above the surrounding soil. The plant settles as the soil compacts, and a buried crown rots faster than a high one.
-
4Backfill with native soil and compost Mix a few handfuls of compost into the dug-out soil and use that to fill the hole. Avoid pure compost or potting mix in the planting hole, since roots get lazy in overly rich soil and never spread into the wider yard.
-
5Water deeply Soak the entire root zone until the top foot of soil feels uniformly damp. This is the most important watering of the shrub's first year and helps the root system make contact with the surrounding soil.
-
6Mulch two to three inches deep Use shredded bark or wood chips, kept a few inches back from the base of the shrub. Mulch holds moisture between waterings, moderates soil temperature, and reduces grass competition during establishment.
Watering and feeding
Watering
Water deeply once a week through the first growing season to establish the root system. Soak the root zone rather than splashing the foliage. Drip irrigation or a soaker hose at the base works best.
After the first year, Little John is drought-tolerant and gets by on rainfall in most climates within its zone range. A deep weekly soak through extended summer dry spells keeps the foliage looking fresh and supports flowering through the warm months. Container plants dry out faster and may need water two to three times a week in summer.
Feeding
Feed lightly in early spring as new growth starts, using a slow-release fertilizer formulated for native or low-phosphorus plants. Little John, like other plants in the same family, is sensitive to high phosphorus and can show leaf damage from heavy applications of standard balanced fertilizers.
Skip phosphorus-heavy bloom-booster products, which can cause leaf burn or root damage. A single light feeding in spring usually carries the plant through the year. Stop feeding by midsummer so new wood hardens off before winter.
Pruning
Little John blooms on this year's new wood, so most pruning happens just after a flowering flush rather than in winter. The dense compact form needs only light shaping to maintain a clean outline, but the plant tolerates harder cuts well when renovation is needed.
Light shaping after each bloom flush
Once a flowering flush fades, trim the tips of the stems back by an inch or two with sharp pruners. The plant responds with a fresh flush of growth that produces the next set of flowers within a few weeks. Skip the formal shearing, which removes both spent flowers and developing new buds.
Removing dead or damaged growth
Cut out any dead, broken, or crossing branches at any time of year. Cut back to a side branch or the main stem rather than leaving stubs, which die back and can introduce disease.
Renovating an overgrown plant
Little John tolerates hard renovation better than most evergreen shrubs. If the plant has lost its shape or developed open patches in the middle, cut it back hard in late winter, even into older wood. New growth pushes from buds along the trunk and main branches within a couple of months. Expect to lose one season of bloom, but gain a denser plant by the following year.
Blooming and color
Little John is grown for the deep red bottlebrush-shaped flowers that appear in flushes from spring through summer and occasionally into fall in mild climates. Each flush lasts two to three weeks, and a healthy plant produces three or four flushes through the growing season.
Bloom timing
The first heavy flush of bloom comes in mid to late spring, with smaller follow-up flushes through summer. In zone 10 or 11 the plant may continue producing blooms sporadically through fall. Each flower brush lasts about two weeks on the plant before fading.
Attracting wildlife
Hummingbirds, native bees, and butterflies all visit the red bottlebrush flowers. The blooms produce abundant nectar and provide a reliable food source for pollinators through the bloom window. Plant near a window or patio for the best chance to watch the wildlife activity up close.
Bronze new foliage
New growth emerges with a soft coppery-bronze color and matures to a deep green as it hardens off. The bronze tints provide a secondary color feature alongside the red blooms and make the spring flush particularly attractive. Avoid hard cuts during the bronze growth phase, since the soft tips are most vulnerable to damage.
Common problems and pests
Most Little John complaints are iron deficiency on alkaline soil, occasional scale insects, and root rot in soggy conditions. The plant is otherwise tough and low-maintenance once established in the right spot.
Yellow leaves between green veins
Iron deficiency, common on alkaline soil. The plant prefers slightly acidic to neutral conditions. Apply a chelated iron product as a foliar spray for fast correction and renew acidic mulch like pine bark or pine needles over the root zone. A soil test confirms whether the underlying issue is true iron shortage or simply alkaline soil locking up the iron the plant cannot use.
Brown leaf tips and edges
Usually fertilizer burn from a heavy or phosphorus-heavy feeding, or salt buildup from hard tap water in container plantings. Flush the root zone thoroughly with low-salt water and switch to a low-phosphorus fertilizer formulated for native plants. Filtered or rainwater works better than hard tap water for container plants.
Bumps on stems and leaves with sticky residue
Scale insects feeding on sap and excreting a sugary residue. Wipe individual scales off with a cotton swab dipped in rubbing alcohol. Heavier infestations respond to horticultural oil sprayed in cooler weather. The sticky residue often grows black sooty mold, which washes off with soapy water once the scale is gone.
Root rot in soggy soil
Yellowing leaves across the whole plant with soft mushy roots when checked. Caused by standing water at the root zone. There is no cure for a plant well into root rot, but a plant caught early recovers if drainage is corrected. Build a raised mound or move the plant to a better-drained spot.
Cold damage on new growth
Brown blotches or fully collapsed new growth following a frost. Little John tolerates light frost down to about 25°F but suffers damage in harder cold. Wait until late spring before cutting anything back, since damaged tips often push fresh growth from buds a couple of inches lower on the branch.
Sparse bloom on a healthy-looking plant
Usually too much shade, too much nitrogen-heavy fertilizer, or too little water through bloom set. Move next year's planting to a sunnier spot and switch to a low-phosphorus native-plant fertilizer in moderation. A deep weekly soak through bloom flushes supports steady flowering.
Aphids on new growth
Small green or black insects clustered on shoot tips and the undersides of new leaves in spring. Knock them off with a strong spray of water. Heavy infestations respond to insecticidal soap. Avoid heavy nitrogen feeding, which produces the soft new growth aphids love.
Sooty mold on leaves
A symptom rather than the underlying problem. The mold grows on the sticky residue left by scale, aphid, or whitefly feeding above. Treat the underlying pest with horticultural oil or insecticidal soap, and the mold washes off with soapy water once the pest is gone.
Open or sparse center of the plant
Usually because the plant has been sheared into a tight outer surface that shades the interior. Switch to selective hand-pruning rather than shearing. Reach into the plant and cut back individual longer branches to side branches inside the canopy, letting light reach the interior and stimulating fresh growth from inside.
Salt damage in coastal or roadside plantings
Brown leaf tips and edges with no other clear cause, especially on plants near roads salted in winter or in beachfront locations. Flush the root zone thoroughly with low-salt water in early spring and again after any major salt deposition event. Build a small berm to redirect runoff away from the root zone in roadside plantings.
About This Article
