How to Plant a Queen of the Night
Plant Queen of the Night, also called Dutchman's Pipe Cactus, in bright indirect light in a chunky, fast-draining mix. From a leaf cutting, callus the cut end for a week, then nest it in slightly damp mix until roots form in four to six weeks. From a nursery transplant, size up only one or two inches in pot diameter. Expect the first famous night bloom in two to three years.
Where to put it
Queen of the Night is a tree-dwelling cactus from Central and South American jungles, so it wants dappled, filtered light rather than the harsh direct sun a desert cactus enjoys. Indoors, give it bright indirect light a few feet back from an east or south window, or right against a north window with strong open sky. A few hours of soft morning sun is welcome, but harsh midday rays through unfiltered glass scorch the flat green leaves.
Keep the plant in a warm room between 60 and 80°F year-round, and away from cold drafts or heating vents. Average household humidity is fine, though the plant rewards 50 to 60 percent humidity with healthier new growth.
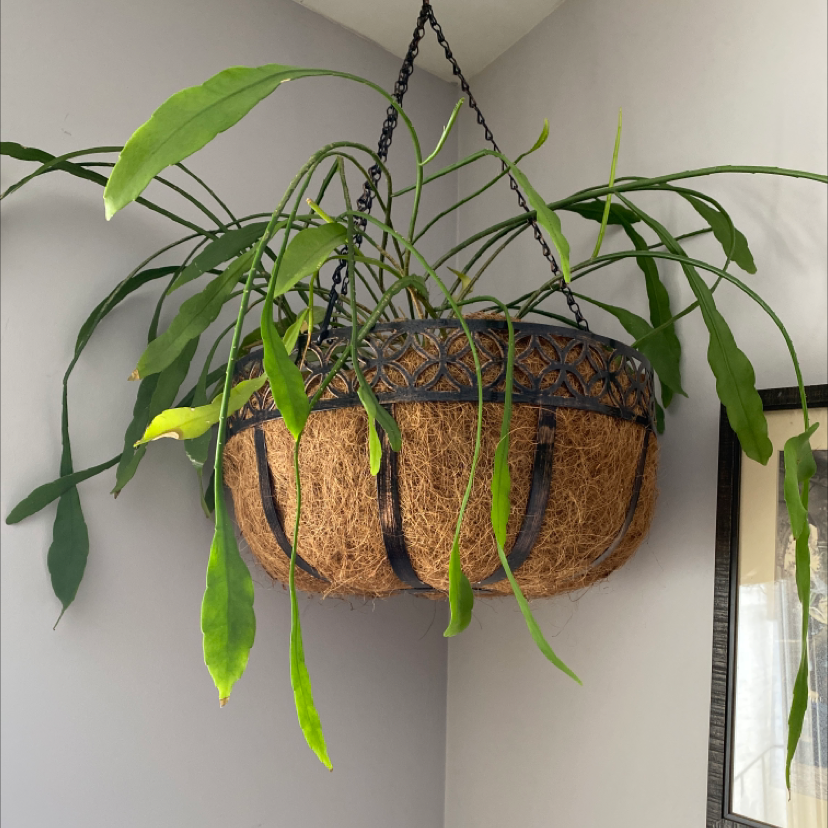
A hanging basket or shelf where the long, strappy leaves can drape and arch is ideal. Mature plants can stretch four to six feet in a hanging container, so allow headroom and a sturdy hook.
Planting from a leaf cutting
Pick a healthy, firm leaf segment six to eight inches long from a mature plant, cut cleanly at the base with a sharp clean blade. The critical rule for cuttings is to let the cut end callus over for five to seven days in a cool dry room before it touches mix. Cuttings planted with a fresh wet cut rot almost every time, since this jungle cactus has no defenses against soil pathogens at an open wound.
-
1Take and callus the cutting Cut a firm, healthy leaf segment six to eight inches long from a mature plant, using a clean sharp blade so the wound is smooth. Set the cutting upright in a cool dry room out of direct sun for five to seven days, until the cut end forms a dry, papery seal. This callus is the plant's defense against rot once it meets damp mix.
-
2Mix a chunky, fast-draining medium Combine roughly two parts orchid bark, one part perlite, and one part peat or coco coir in a small bowl. This blend mimics the loose, airy litter Queen of the Night grows in on rainforest tree branches, so water passes through fast and air reaches the new roots. A standard cactus mix is too sandy and dense for a tree-dwelling cactus.
-
3Pot the cutting at shallow depth Pour an inch or two of the bark mix into a four-inch pot with drainage holes to form a base layer, then set the cutting upright with the callused end one inch deep into the mix, and backfill chunky mix around the sides to hold it steady. Firm the surface lightly with your fingertips. Too deep buries living tissue and invites rot, while too shallow lets the cutting topple.
-
4Mist lightly and place in bright shade Mist the surface of the mix with a spray bottle until just barely damp, never soaked, and set the pot in bright indirect light at 65 to 75°F. Wait a full week before any further watering, then water lightly only when the top of the mix dries out. Roots typically anchor within four to six weeks, signaled by gentle resistance when you tug the cutting.
Planting from a nursery transplant
Give a freshly bought Queen of the Night two to three weeks in its nursery pot before transplanting. Moving it the day it comes home stacks transplant shock on top of the change from greenhouse to your home. Once the plant has acclimated to your light, temperature, and watering rhythm, size up only one or two inches in pot diameter, since a snug root zone discourages soggy mix and helps trigger blooming.
-
1Pick a pot one or two inches wider Choose a hanging basket or container with sturdy drainage holes, only one to two inches wider than the current nursery pot. Terracotta and clay let excess moisture evaporate, which suits this tree-dwelling cactus, though any material works if drainage is good. An oversized pot holds wet mix the roots cannot drink fast enough, leading to rot.
-
2Prepare the chunky mix Mix roughly two parts orchid bark, one part perlite, and one part peat or coco coir until the blend feels loose and airy in your hand. This open structure mirrors the leaf litter and bark debris Queen of the Night roots into on jungle trees. Standard houseplant or cactus mixes hold too much water and slowly suffocate the roots.
-
3Slide the plant in and backfill around it Pour an inch or two of the chunky mix into the bottom of the new pot to set a base layer, then ease the plant out of its nursery container by tipping it sideways and supporting the leaves. Set the root mass on top of the base layer so the crown sits about half an inch below the rim, then backfill chunky mix around the sides and firm gently. Do not bury the crown deeper than it sat in the nursery pot.
-
4Water in lightly and let it settle Water slowly until a small stream runs from the drainage holes, then stop. Drain the saucer completely and set the plant in its permanent bright indirect spot. Wait until the top two inches of mix dry before watering again, usually seven to ten days, since freshly disturbed roots are most vulnerable to rot in their first weeks.
The first month and a half
Most of what happens in the first six weeks after planting is invisible. The plant is anchoring new roots into the chunky mix and rebuilding the fine root hairs that were lost during the move. You should not expect any new top growth, and you may see one or two older leaves yellow and drop as the plant redirects energy.
The single most common new-grower mistake is overwatering during this stretch. Soft, mushy patches at the base of the leaves are a sign the roots are drowning, not thirsty. Stick to watering only when the top two inches of mix dry, and skip fertilizer entirely for the first six weeks.
The famous payoff, a single huge fragrant white flower that opens after dark for one night only, comes years down the road. Patience now sets up the rooted, mature plant that will eventually bloom.
What can go wrong
-
Cutting going soft and mushy at the base
The cutting was planted before the cut end calloused over, so soil moisture entered the open wound and rot set in. Pull the cutting, trim off the soft tissue back to firm green flesh, and start the callus process over with a fresh dry rest of five to seven days. Use barely damp mix next time, not wet, and wait a full week before the first watering. -
Yellow or pale washed-out leaves after transplant
Direct sun is scorching the foliage, especially through unfiltered glass. Queen of the Night evolved under the dappled canopy of jungle trees and burns quickly in harsh light. Move the plant a few feet back from the window or behind a sheer curtain. Existing pale patches will not green back up, but new growth will return to a healthy deeper green. -
Soft black spots spreading along the leaf segments
This is rot from soggy mix or water sitting on the leaves. The mix is staying wet because the blend is too dense, the pot is too large, or watering is too frequent. Unpot, trim affected segments back to clean firm tissue with a sterile blade, repot in a chunkier orchid bark blend, and let the top two inches dry fully between waterings. -
Cutting failing to root after six weeks
Either the room is too cold, the mix is bone dry, or the cutting was a thin or damaged segment to begin with. Roots form fastest at 70 to 80°F in a mix that stays just barely damp at depth. Move the pot to a warmer spot, mist the surface lightly once a week, and give it another three to four weeks before judging the cutting a failure. -
Leaves wrinkling or turning crispy at the tips
The plant is underwatered or in an environment that is too dry. Soak the pot in a sink of water for ten minutes until the mix is evenly moist, then let it drain fully. Going forward, water when the top two inches of mix dry rather than on a strict schedule, and consider running a small humidifier nearby in winter when indoor air dries out. -
Older leaves yellowing and dropping
A few older leaves shedding in the first month is normal transplant adjustment as the plant resets its energy budget. If yellowing keeps spreading to younger leaves after week six, check for soggy roots or low light. Repot if the mix smells sour and move the plant closer to a bright window with filtered light if the spot looks dim. -
No new growth after eight to ten weeks
Cool room temperatures, low light, or a pot far oversized for the root mass all slow new growth to a halt. Confirm the room stays above 65°F day and night, check that the plant gets bright indirect light most of the day, and lift the plant out gently to see if the roots have actually reached the pot walls. A snug pot with bright warmth usually wakes growth within another two to three weeks.
About This Article
