How to Plant a Peace Lily
Plant your Peace Lily in a pot one to two inches wider than its nursery container, using a chunky well-draining houseplant mix and a pot with drainage holes. Place it where it receives bright indirect light, away from cold drafts and hot sun. Keep the soil evenly moist but never soggy. Most plants settle in within two to three weeks and push a new leaf by week six.
Where to put it
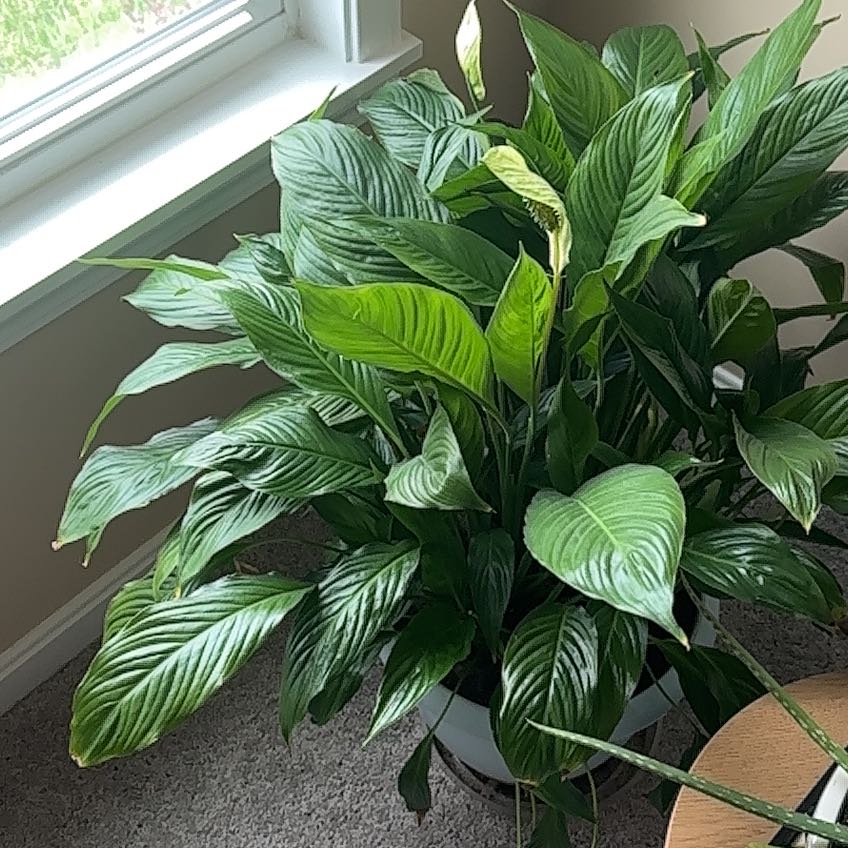
Peace Lily comes from the dim understory of Central and South American rainforests, where it grows under a thick canopy in steady warmth and high humidity. Indoors that translates to bright indirect light, the kind you get a few feet back from a north or east window or filtered through a sheer curtain on a south or west exposure. Direct sun scorches the glossy dark leaves and bleaches the white spathes.
Room temperature between 65 and 80°F suits the plant year round. Keep it away from cold drafts under 60°F, the blast from a heating vent, and the chill from an AC vent. All three dry out the foliage and cause brown leaf tips.
Average household humidity is fine for established plants, though you will see fewer brown tips on a humid bathroom shelf than in a dry winter living room. One important note for households with cats or dogs. Peace Lily contains calcium oxalate crystals that irritate the mouth and throat when chewed, so place the plant somewhere your pets cannot reach it.
Planting from a nursery transplant
Give your Peace Lily two to three weeks in its nursery pot before repotting. Moving it the day it comes home stacks transplant shock on top of the change from greenhouse to your home, and a stressed plant often droops dramatically for weeks. The single most important rule for this plant is consistent moisture in a mix that drains freely. Soggy roots rot within days, and a fully dried-out root ball causes the whole plant to collapse into a wilt that takes weeks to recover from.
-
1Pick a pot with drainage holes Choose a pot one to two inches wider than the nursery pot, no bigger. Drainage holes are non-negotiable since Peace Lily roots rot in standing water within a few days. If you love a decorative pot without holes, use it as a cover pot only and keep the plant in a nursery liner you can lift out to water.
-
2Mix a chunky, well-draining blend Peace Lily wants moisture but hates suffocating roots, so a standard potting soil amended with extra perlite and a handful of fine bark works well. A common ratio is two parts potting mix, one part perlite, and one part fine orchid bark. The bark and perlite keep air pockets in the soil so roots can breathe between waterings.
-
3Slide the plant in and set the depth Add a base layer of mix to the new pot, set the plant on top so the top of the root ball sits about half an inch below the rim, and backfill around the sides with more mix. Press gently to remove large air pockets, but do not compact the soil hard. The crown, where the leaves emerge from the soil, should sit at the same height it grew at in the nursery pot.
-
4Water in and let it drain fully Water slowly and thoroughly until you see water running from the drainage holes. This settles the soil around the roots and removes the last air pockets. Let the pot drain completely on a saucer or in the sink for ten or fifteen minutes, then pour off any standing water before returning the plant to its spot.
-
5Place it and leave it alone Set the plant in its chosen bright indirect spot and let it settle for two to three weeks without fertilizer, without moves, and without a second repot. Expect some leaf droop in the first few days as the roots adjust. As long as the soil is evenly moist and the plant is not sitting in water, the leaves should perk back up within a week.
The first month and a half
The first weeks after planting a Peace Lily are mostly an underground story. Roots are pushing into the new mix and stretching toward the edges of the pot, while the leaves you see on top may not change much at all. Some plants droop noticeably for the first few days, which is a normal response to root disturbance rather than a sign of trouble.
The most common new-grower mistake during this window is reading flat above-ground change as a problem and either watering too often or moving the plant around. Both make things worse. Roots need a steady stable environment to establish, and consistently wet feet trigger the root rot this plant is most vulnerable to.
Healthy first-month signs look like firm upright leaves, soil that dries out a bit on top between waterings, and one new leaf push from the center of the plant by week six.
What can go wrong
-
Major wilting and droop after planting
Root disturbance during transplant is the usual cause, and most plants recover on their own within a week. Make sure the soil is evenly moist but not waterlogged, and keep the plant out of direct sun while it recovers. If the droop continues past two weeks, gently lift the plant and check the roots. Healthy roots are white or pale tan, while mushy brown roots mean the mix is staying too wet and needs more drainage. -
Brown leaf tips and edges
Dry air, fluoride or chlorine in tap water, and inconsistent watering are the three main causes. Let tap water sit uncovered overnight before using it, or switch to filtered or rainwater. Keep the plant away from heating and AC vents that pull moisture out of the foliage. Trim the brown tips back with clean scissors following the natural leaf shape, since old damage will not turn green again. -
Yellowing leaves across the plant
Overwatering is the most common cause, especially in the first month after planting when roots are still establishing. Stick your finger into the soil an inch deep. If it feels wet, hold off on watering and let the top inch dry before the next round. Yellow lower leaves on an otherwise healthy plant can also just be old foliage retiring, which is normal at the rate of one or two leaves at a time. -
Black or mushy stems at the soil line
Root and crown rot from soggy soil is a serious problem and the most common way Peace Lily plants die. Unpot the plant immediately, rinse the roots clean, and trim off any black mushy tissue with clean scissors. Repot into a fresh chunky well-draining mix in a smaller pot, water only when the top inch dries, and accept that recovery is uncertain once rot reaches the crown. -
Pale washed out leaves with brown patches
Too much direct light is bleaching the foliage and burning the cells. Move the plant a few feet back from the window or behind a sheer curtain so the light reaches it as bright but filtered. Burned patches will not heal but new leaves will grow in normal once the light is right. South and west windows in summer are the most common culprits. -
Dark green leaves but no flowers
Not enough light is the usual cause. Peace Lily survives in low light but needs bright indirect light to push the white spathes that give the plant its name. Move it closer to a brighter window without putting it in direct sun. A balanced houseplant fertilizer at half strength once a month during spring and summer also helps the plant build the energy it needs to bloom. -
Tall floppy leaves leaning sideways
Light coming from only one direction is making the plant stretch toward the window, and the leaves grow long and weak. Rotate the pot a quarter turn every week or two so all sides of the plant get equal light. If the leaning is severe, the spot may be too dim overall and a brighter location will produce shorter sturdier growth. -
White crust on the soil surface
Salt buildup from tap water minerals or fertilizer is the cause, and over time it can damage roots and burn leaf tips. Flush the pot with plain water every few months by running water through until it pours freely from the drainage holes for a full minute. If the crust keeps coming back, switch to filtered or rainwater and cut back on fertilizer to once a month at half strength.
About This Article
