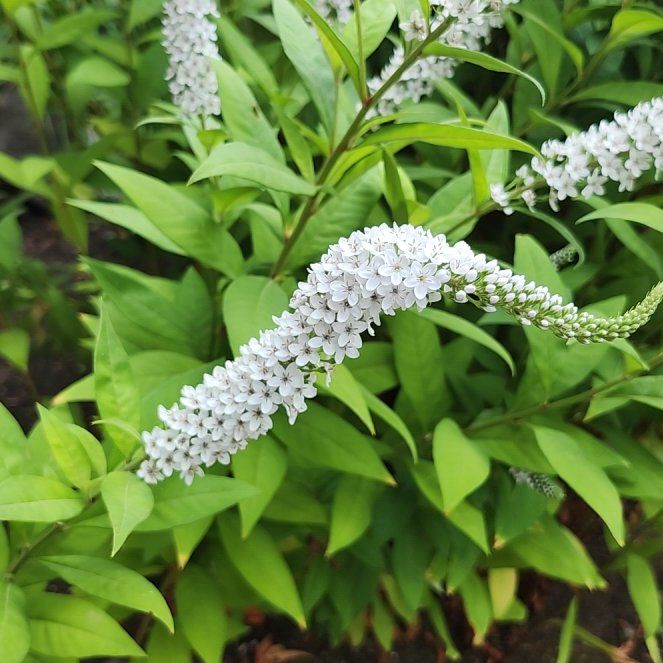
How to Plant a Gooseneck Loosestrife
Plant Gooseneck Loosestrife in spring or fall in full sun to part shade, in moist soil with a 6 to 12 inch root barrier sunk around the bed or a wide container. The plant spreads aggressively by underground stems and will colonize a small garden bed in a single season. Space plants 18 to 24 inches apart. Expect a 2 to 3 foot leafy clump with curving white flower spikes by mid-summer of year one.

When and where to plant
Gooseneck Loosestrife is hardy from zone 3 through zone 9 and thrives in full sun to part shade, four to six hours of direct light a day. Plants grown in part shade tend to lean toward the sun and need light staking, while full sun in cool northern zones gives the sturdiest stems.
Plant in spring once the ground has thawed and warmed, or in early fall about six weeks before your first hard freeze. The site needs consistently moist soil that does not dry out for long stretches in summer. Loose loamy ground at the edge of a pond, rain garden, or low wet corner of the yard is ideal. Heavy clay is fine as long as it does not stay waterlogged for days after rain. Soil pH from slightly acidic to neutral is the sweet spot, roughly 5.5 to 7.0.
The location decision matters more for this plant than for almost anything else you might put in the ground. Gooseneck Loosestrife spreads vigorously through underground stems and will move four to six feet out from the original clump in two to three years, smothering smaller neighbors. Reserve it for large beds where that spread is welcome, or commit to a 6 to 12 inch deep root barrier sunk around the planting area, or grow it in a wide container.
Planting a container-grown nursery plant
The single most important decision with Gooseneck Loosestrife happens before the shovel hits the ground. The plant moves through soil by sending out horizontal underground stems that surface as new shoots, and it will take over a mixed perennial bed faster than most gardeners expect. Site it in a dedicated large bed where spread is welcome, or install a root barrier first.
-
1Decide on containment before you dig If the planting site is a small or shared bed, install a 6 to 12 inch deep root barrier around the area before planting, or plan to grow the plant in a 16 inch or wider container instead. The underground stems travel along the top 6 inches of soil, so a shallow edging will not hold them back. Skipping this step is the single most common regret with this plant.
-
2Pick a cool planting day Aim for a cool overcast day in spring after the last hard frost or in early fall about six weeks before your first hard freeze. Hot sunny weather pulls moisture out of the freshly transplanted foliage faster than the new roots can replace it. If you must plant on a warm day, do it in the early morning and water deeply right after.
-
3Dig the hole twice as wide Measure the root ball, then dig a hole twice as wide and the same depth, not deeper. A wide hole loosens the surrounding soil so the new roots can push laterally into native ground. Setting the plant too deep buries the crown and invites rot.
-
4Set the plant at soil level and backfill Slide the plant out of the nursery pot and place it so the top of the root ball sits flush with the surrounding soil. Backfill with the same native soil you removed, firming gently with your hands to remove large air pockets. The crown of the plant, where the stems emerge from the roots, must stay right at the soil surface.
-
5Water in and mulch lightly Water deeply at the base until the soil settles around the roots, then top with two inches of mulch to hold moisture and slow weeds. Keep the mulch a couple of inches back from the crown so it does not trap dampness against the stem bases. Continue watering once or twice a week through the first year whenever the top inch of soil feels dry.
Planting a division
Divisions are the most common way gardeners share Gooseneck Loosestrife, since a mature clump can be lifted and split into many vigorous pieces in spring or fall. The same containment rule applies before planting a division as for a nursery plant. The division will establish faster than a small container plant because it arrives with substantial underground stem already attached.
-
1Confirm the bed is contained first Before placing a division, make sure the planting bed has a root barrier installed or that you are planting into a wide container. A division comes with mature underground stems already pushing outward, so the spread starts the day you plant. Skipping the barrier with a division leads to escape even faster than with a small nursery plant.
-
2Trim the division and keep it moist Look at the piece of plant you received and snip off any broken roots or stems with clean pruners. If the division has been out of the ground for more than an hour, soak the roots in a bucket of water for 20 to 30 minutes to rehydrate before planting. Dry roots take much longer to recover and the plant will sulk for weeks.
-
3Dig a wide hole at the right depth Dig a hole twice as wide as the root mass and just deep enough that the crown of the division will sit at the soil surface when you backfill. The crown is where the green shoots emerge from the roots. Burying the crown leads to rot, while setting it too high leaves the surface roots exposed to dry out.
-
4Place, backfill, and water in Hold the division upright with the crown at soil level and backfill with the native soil you removed, firming gently around the roots. Water deeply at the base until the soil settles, then top with two inches of mulch kept back from the crown. Keep the soil consistently moist for the first 4 to 6 weeks, watering once or twice a week if rain is light.
The first year
The first year for a newly planted Gooseneck Loosestrife is mostly about the plant building out its root system and beginning to send underground stems horizontally through the soil. You will see steady above-ground growth too, but the most consequential action is below the surface where the plant is staking out future territory.
The most common new-grower mistake in year one is letting the soil dry out during establishment. Even though mature plants tolerate brief dry spells, a first-year plant with a small root system can scorch and lose leaves quickly in a summer dry stretch. Water once a week to a depth of 6 inches whenever rainfall is light. Skip the fertilizer in year one. The plant does not need it, and feeding pushes faster spread before the gardener has had a chance to see how the clump behaves.
Healthy first-year growth looks like sturdy upright stems reaching 1 to 2 feet tall by mid-summer, with the curving white flower spikes appearing on the strongest stems. Some plants hold their flowering until year two while they establish.
What can go wrong
-
Wilting after planting
Transplant shock from the move out of the nursery pot or division is the usual culprit, especially in warm weather. Water deeply at the base and shield the plant from direct afternoon sun for the first week if temperatures are above 80°F. Check that the crown is at soil level and not buried. Most plants recover within 7 to 10 days once roots find moisture in the surrounding soil. -
New shoots escaping the bed
If you start seeing fresh stems popping up several inches outside the original planting area, the underground stems have moved past the edge of the bed. This happens fast in moist loose soil. Dig out the wayward shoots and trace the underground stem back to where it crossed the boundary, removing as much as you can. Then install or repair a root barrier 6 to 12 inches deep around the bed before the next growing season. -
Floppy stems that lean and break
Stems that flop usually mean the plant is in too much shade and reaching for light, or the soil is too rich from heavy fertilization. Move plants to a sunnier spot in fall, or thin overhead branches if a tree is shading the site. Avoid feeding the plant in year one, and use a single ring of stakes or grow-through support installed in early spring before the stems get tall. -
Few or no flowers in year one
Many newly planted clumps spend their first summer building roots and skip flowering, which is normal. Make sure the plant is getting at least four hours of direct sun a day, since shade reduces bloom dramatically. Avoid fertilizing, which pushes leafy growth at the expense of flowers. Most plants bloom reliably from year two onward once the root system is established. -
Leaf scorch with brown crispy edges
Drought stress is the most common cause in the first year, especially in full sun. The plant prefers consistently moist soil and a small first-year root system cannot pull moisture from deep down. Water deeply once a week and let the soil dry only slightly between waterings. Refresh mulch to 2 inches if it has thinned, keeping it back from the crown. -
Powdery mildew on leaves
A white dusty coating on the leaves shows up most often in late summer when nights are humid and air around the plant is stagnant. Improve airflow by thinning crowded stems and pulling weeds at the base. Water at the soil line in the morning rather than overhead in the evening so leaves dry quickly. Affected leaves can be removed and discarded in the trash, not the compost. -
Mushy stems at the crown
Crown rot from waterlogged soil is the usual cause and shows up as soft brown stem bases that pull away easily. The plant tolerates moist ground but not standing water on the crown. Lift the plant if the area stays saturated for more than a day after rain and replant on a slight mound, or move to a better-drained spot. Going forward, water based on whether the soil feels dry an inch down rather than on a set schedule. -
Pale yellow-green leaves in deep shade
When the plant gets less than three or four hours of direct sun a day, the leaves lose their healthy mid-green color and fade to a pale yellow-green. The plant also tends to grow taller and floppier searching for light. Move the plant to a brighter spot in fall, or thin overhead branches to open up more direct sun. Pale leaves alone are not an emergency, but the plant will never flower well in deep shade.
About This Article
