How to Plant a Tomato
Plant tomato transplants outside after your last spring frost, once the soil reads 60 to 65°F at four inches deep. Dig a hole deep enough to bury two-thirds of the stem, since tomato stems grow new roots from any tissue in contact with soil. Space plants 18 to 36 inches apart in full sun with rich, well-drained soil. Harvest comes 60 to 100 days after transplanting.
When and where to plant
Tomatoes need full sun, six to eight hours of direct light a day. Less than that and the plants produce leaves but few fruits. A south or west-facing spot with all-day exposure is the strongest position in most US gardens.
Plant after your last spring frost has passed and the soil reads 60 to 65°F at four inches deep. Cold soil stalls the roots and stresses the transplant for weeks. In cooler zones, growers often warm the soil with black plastic for a week before planting.
Soil should be loose, rich, and well-drained, with a pH between 6.0 and 6.8. Heavy clay compacts around the root system and slows growth, so amend with compost before planting. Allow 18 to 36 inches between plants depending on the growth habit, with closer spacing for compact bush types and wider for sprawling vines.
Planting your tomato transplants
Pick stocky plants with thick stems and dark green leaves. Pass on leggy or pale ones, since they struggle to establish. If your transplant is already flowering, pinch off the blooms after planting so the plant invests in roots first. The critical rule for tomatoes is depth. Tomato stems grow new roots from any tissue in contact with soil, so a deeper-planted plant ends up stronger and more drought-tolerant.
-
1Harden off home-grown seedlings If you grew your own seedlings indoors, set them outside in shade for two hours on day one, then add an hour each day, reaching direct sun by day five. Garden-center transplants are usually already hardened off at the nursery and can go straight in. Skipping this step for home-started plants is a common cause of transplant failure.
-
2Dig the hole deep enough to bury two-thirds of the stem For an 8-inch transplant, that means a hole about 5 to 6 inches deep, not the pot-depth a beginner might dig. Loosen the soil at the bottom and sides so the new roots can push outward into native soil.
-
3Pinch off the lower leaves and plant deep Remove the bottom two-thirds of leaves so only the top set remains. Place the plant in the hole so the lowest remaining leaves sit just above the finished soil level. Backfill with native soil mixed with compost, pressing gently to settle. The buried stem sprouts new roots within about ten days.
-
4Water in deeply and stake or cage immediately Soak the planting area until the soil is wet six inches down. Drive a stake or set a cage now, while the roots are still small. Adding support later disturbs the spreading root system and stresses the plant.
Direct sowing in zones 9 and warmer
If you grow in USDA zone 9 or warmer, you can skip the transplant step and sow tomato seeds directly in the garden. The growing season is long enough for the seeds to germinate, grow, and fruit before fall. In cooler zones the season is too short for direct-sown tomatoes to ripen, so transplanting stays the right path.
-
1Wait for warm soil Soil at four inches deep should read 60 to 65°F before the seeds go in. Cold soil rots tomato seeds rather than germinating them. Warming the planting area with black plastic for a week helps in marginal-zone gardens.
-
2Plant two or three seeds per spot Push seeds a quarter inch into loose soil with your finger. Plant two or three per spot in case some fail to germinate, with spots 18 to 36 inches apart. Cover lightly and press to settle. Mark each spot so you know where to expect sprouts.
-
3Water and keep the surface moist Sprinkle the planted area to settle the seeds. Keep the surface lightly moist for the first week to ten days until germination. Avoid soaking, since wet soil crusts and traps emerging sprouts below the surface.
-
4Thin to one strong seedling per spot Once seedlings are four to six inches tall, snip the weaker ones at the base, leaving the strongest in each spot. Pulling disturbs the remaining root system. Stake or cage now while the surviving plants are still small.
The first month
Newly planted tomatoes spend the first week or two settling into the new soil. You may see the plant pause or even drop a leaf or two as it shifts focus to root growth. That is normal and not a sign of trouble.
Aim for one to two inches of water per week, total. Split that across two deep waterings rather than daily shallow ones, since shallow watering trains roots to stay near the surface where they dry out fast in summer heat. Hold off on fertilizer for two weeks after planting, then begin a balanced liquid feed every two weeks.
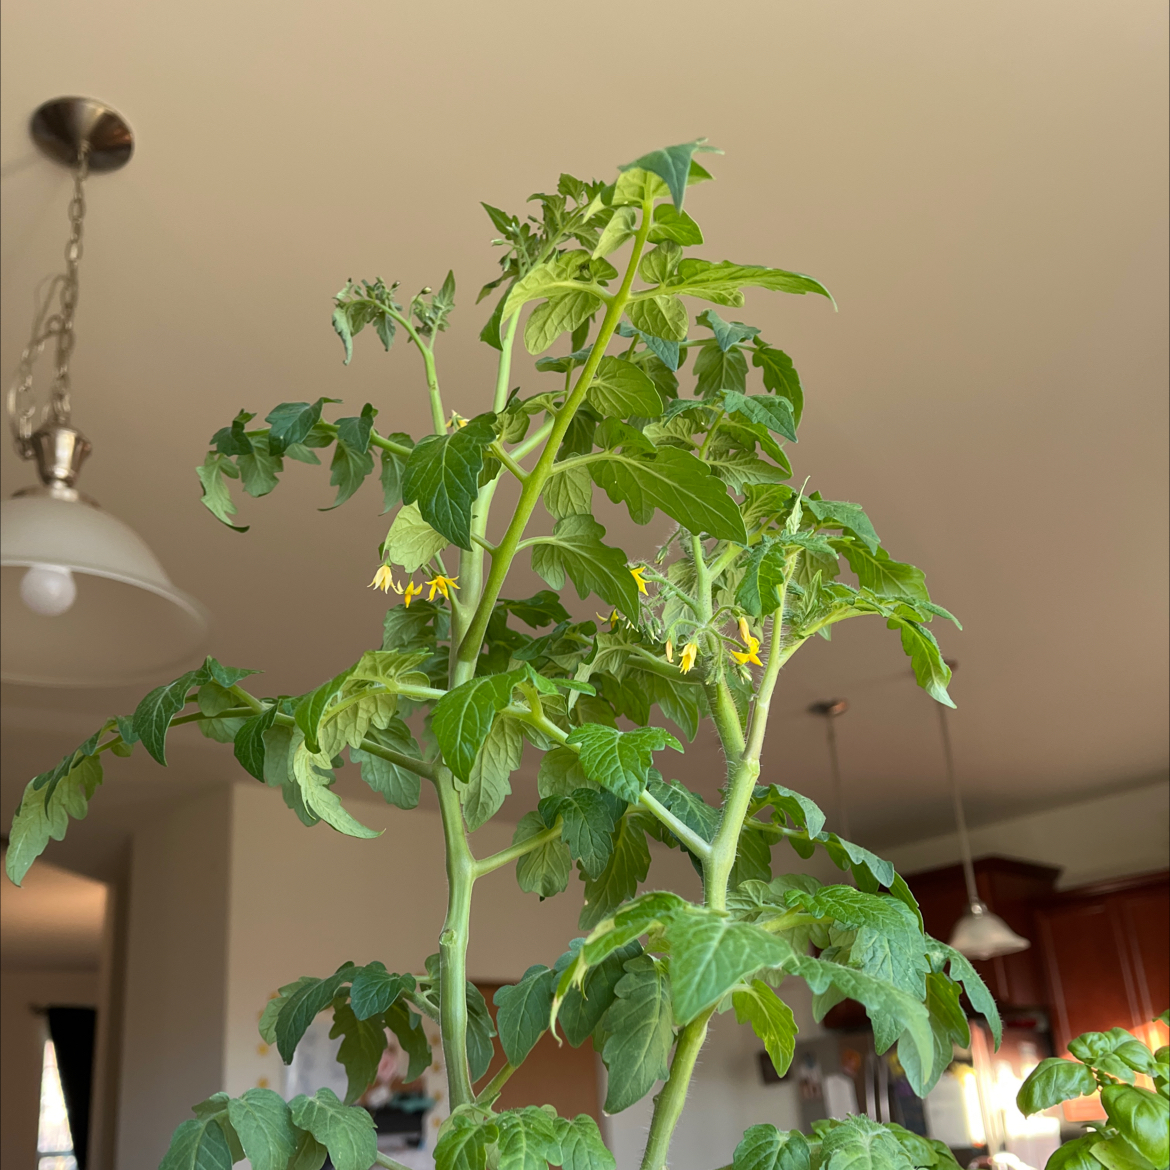
Healthy plants are visibly bigger by week four with several sets of new leaves. First flowers usually appear in weeks four to six, sometimes sooner in warm-climate gardens. Cool nights below 55°F can delay flowering by another week or two.
What can go wrong
-
Wilting after transplant
Leaves droop and curl within a day or two of planting. Often traces back to skipping hardening off, since the plant went from indoor light straight into wind and direct sun. Set up a shade cloth or umbrella for afternoon shade for three days, water deeply once, and resist the urge to fertilize. Most plants recover within a week. -
Frost damage on young plants
Leaves turn dark and water-soaked, then crispy after an unexpected cold night. The cold killed the exposed tissue. Pinch off the damaged leaves and cover with frost cloth on any night below 50°F for the next two weeks. The plant survives if the stem is intact, but growth pauses for a week or more. -
Leggy or floppy transplant
The plant grew tall and thin under low light at the nursery. Solve this at planting by burying the long stem horizontally in a shallow trench rather than vertically deep. The buried stem grows roots along its length and the upturned top settles upright within two weeks. -
Stem cut through at the soil line
Cutworms. The larvae of certain night-flying moths chew the stem at the surface and the plant topples in the morning. Slip a cardboard collar or aluminum foil sleeve around the stem at planting time, reaching one inch above and one inch below the soil line. Cutworms cannot grip the smooth barrier and move on. -
Yellow lower leaves in week two or three
The plant is shedding its older leaves as it diverts energy to new growth, which is normal in moderation. If most lower leaves yellow at once, check for soggy soil or compacted clay around the base. Ease back on watering for a few days to let the soil dry, and begin a diluted liquid feed once the plant stabilizes. -
No flowers by week four
Patience. Most tomatoes flower in weeks four to six, and indeterminate vines often start later than determinate types. Cool nights below 55°F delay flowering by a week or two. Once daytime temps stay above 65°F and nights above 55°F, flowers appear within a week.
About This Article
