How to Plant a Coconut Palm
Plant a coconut palm outdoors in zones 10 and 11 in full sun, sandy fast-draining soil, and a spot sheltered from steady wind. For a sprouted coconut, lay the nut on its side and bury only the bottom half to two thirds, leaving the rest of the husk visible. For a nursery palm, dig the hole the same depth as the root ball. Water deeply each week and expect slow steady growth through the first year.
When and where to plant
Coconut palms thrive only in true tropical climate, USDA zones 10 and 11, where winter lows stay above 32°F. Frost kills young palms outright, and even a few hours at 40°F sets back growth for months. South Florida, the southernmost tip of Texas, Hawaii, and parts of southern California work. Anywhere colder, the palm has to live in a heated greenhouse or it simply will not survive.
Full sun is the rule, eight or more hours of direct light a day. Anything less and the palm grows leggy, with thin pale fronds and weak trunk caliper. The site needs sandy, fast-draining soil with no standing water. Coconuts evolved on tropical beaches and storm-shaped soils, so they handle poor sandy ground and salt spray beautifully but rot fast in heavy clay.
Plant during the warm rainy season, May through August in most regions, when soil temperatures are reliably above 75°F and natural rainfall takes pressure off your watering. Give the palm 20 to 25 feet of clearance from buildings, power lines, and other tall trees, since a mature coconut reaches 50 to 80 feet tall with a 15 to 25 foot frond spread.
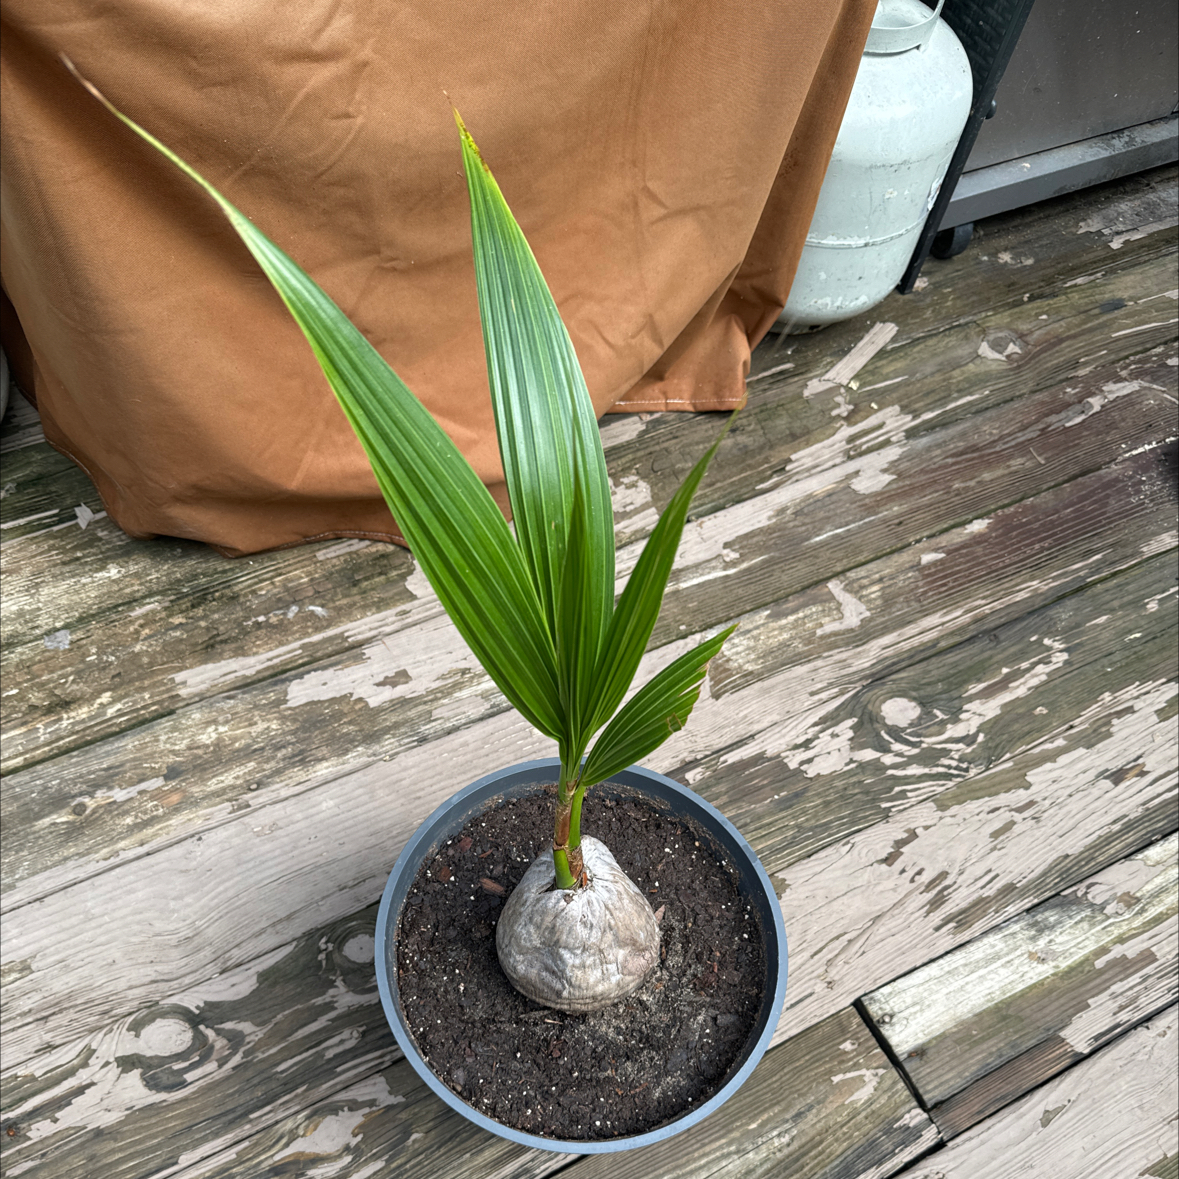
Planting from a sprouted coconut
The single most important rule is depth. The coconut must NOT be fully buried. Leave a third to a half of the husk visible above the finished soil line, because the nut itself is the seedling's food reserve and needs air exposure to avoid rotting before the young palm can support itself. A coconut fully buried in damp soil molds and softens within weeks, killing the sprout inside.
-
1Pick a coconut that is already sprouting Choose a fresh ripe coconut with a green shoot already pushing out of one of the soft eyes at the top. A coconut that has been sitting on a store shelf for months rarely sprouts, so look for one that feels heavy with water when shaken and shows a clean green or pale yellow shoot 2 to 6 inches long. If yours has not started sprouting yet, set it in a warm spot at 80 to 90°F with the eyes facing up for a few weeks until a shoot appears.
-
2Prepare a wide shallow planting hole Dig a hole about twice as wide as the coconut and only deep enough that half to two thirds of the husk sits below your finished soil line. The hole does not need to be deep. The point is room for the roots to push out sideways through loosened soil, not to bury the nut. Mix the soil you removed with coarse sand if your ground holds water, because a soggy nut rots before the palm can establish.
-
3Set the coconut on its side at the right depth Lay the sprouted coconut on its side in the hole, with the green shoot tilted slightly upward and the husk roughly horizontal. The roots will emerge from along the underside of the nut while the shoot grows up from the top. Position the coconut so that one third to one half of the husk stays visible above your finished soil line. The husk is the seedling's pantry and will rot if completely buried in damp soil.
-
4Backfill loosely and water in Fill the hole around the lower half of the coconut with the sandy soil mix, firming gently with your hands but not packing it hard. Water deeply once to settle the soil and remove large air pockets around the emerging roots. Do not mound soil up over the top of the coconut. The exposed husk is doing exactly what it should.
-
5Mulch lightly, away from the husk Spread a thin one inch layer of bark or leaf mulch around the planting area to hold soil moisture, but keep the mulch a full six inches back from the coconut itself. Mulch piled against the husk traps moisture and invites the rot the depth rule is meant to prevent. Water deeply every three to four days through the first month while the roots establish.
Planting a container-grown palm
For a nursery palm, the critical rule shifts from husk exposure to root-ball depth. The palm must sit at the exact same depth in the ground as it was growing in the container. Planting too deep buries the base of the trunk and invites the same rot problem, and planting too shallow leaves roots exposed to dry air. Match the existing soil line on the trunk and you are most of the way there.
-
1Pick a healthy young palm Look for a palm with at least three to five fully open green fronds and no yellow or brown discoloration on the lower trunk. Avoid palms with soft mushy spots near the base or fronds that pull out with light tugging, since those are signs of trunk rot or boron deficiency. A three to seven gallon palm is the easiest size to plant by hand and establishes faster than larger field-dug palms.
-
2Dig the hole twice as wide, the same depth Measure the height of the root ball, then dig a hole that is the exact same depth and twice as wide. A wide hole loosens the surrounding soil so roots can push outward into native ground, which is where most of the year-one root growth happens. Resist the urge to dig deeper than the root ball, because the palm settles and the base ends up below grade.
-
3Slide the palm in at the original soil line Lift the palm out of the container and check the sides of the root ball for circling roots, gently teasing any thick circling roots straight. Set the palm in the hole so that the soil line on the trunk, where the container soil ended, sits exactly at your finished soil line. The base of the trunk should never be buried below the line it had in the pot.
-
4Backfill, water in, and stake if needed Backfill the hole with the same native soil mixed with coarse sand if drainage is marginal, firming gently to remove air pockets without compacting. Water the planting hole deeply until the soil settles, then top up any low spots. For young palms in windy sites, drive three stakes around the root zone and tie soft fabric ties to the trunk for the first six months to prevent the root ball from rocking loose.
The first year
The first year for a newly planted coconut palm is mostly an underground story. The plant is investing energy in pushing roots out into the surrounding soil and building the base structure that supports decades of trunk growth, so you should not expect dramatic top growth above the soil line.
The most common new-grower mistake is reading slow above-ground growth as a sign of trouble and overcompensating with extra fertilizer or daily watering. Both can cause real problems. Wet feet invite the root rot coconuts are most vulnerable to, and heavy fertilizer pushes weak frond growth before the root system can support it. Stick to deep weekly watering and hold off on heavy fertilizer until the second growing season.
Healthy first-year growth looks like steady deep green fronds, one or two new fronds emerging from the growth point, and no yellowing or browning beyond the very oldest lower fronds, which naturally fade out as new ones replace them.
What can go wrong
-
Buried coconut rotting underground
The husk was fully covered with soil and trapped moisture against the nut. Coconuts rot from the inside out in damp warm soil, killing the embryo within a few weeks. Gently lift the nut, brush off the soil, and replant at the correct depth with the upper third to half of the husk above the finished soil line. If the husk already feels soft or smells sour, the seed is lost and you need a fresh sprouted coconut. -
No shoot emerging from the planted coconut
Cool soil is the most common cause, since coconut embryos need sustained warmth at 75°F or higher to sprout reliably. Check that the planting site stays warm day and night, and avoid planting between November and March even in zones 10 and 11. A coconut that has not pushed a shoot within eight to twelve weeks of warm-soil planting was likely not viable to begin with and should be replaced. -
Yellow or browning fronds after planting
Transplant shock from disturbed roots is the typical cause in the first month, especially for nursery palms moved from shade-house growing conditions into full sun. Check that the root ball is staying moist but not soaked, and provide light afternoon shade with a piece of shade cloth for the first two to three weeks. Existing fronds will not fully recover, but new growth from the center should emerge healthy. -
Mushy trunk base or rotting roots
Waterlogged soil starves roots of oxygen and lets soil pathogens attack the trunk base. Heavy clay, low-lying ground, or daily light watering on top of natural rainfall all cause this. Lift the palm if the soil stays saturated more than a day after rain, and replant on a six inch mound or move to a sandier site. Water deeply but infrequently, letting the soil dry slightly between waterings. -
New fronds emerging small and frizzled
This is classic boron deficiency, common in sandy coastal soils that leach the nutrient quickly. New growth comes out crinkled, short, and sometimes with hooked tips, while older fronds look fine. Apply a light dose of borax dissolved in water around the root zone, no more than a tablespoon per palm, and follow up with a complete palm fertilizer the next spring. Overdosing on boron is more damaging than the deficiency itself. -
Older fronds yellowing from the tips inward
Potassium deficiency is the usual cause, especially in sandy soils where rain washes the nutrient out faster than the palm can take it up. The oldest lower fronds show translucent yellow or orange spots near the tips first, working back toward the trunk over months. Apply a slow-release palm fertilizer formulated with potassium and magnesium, and do not remove the yellowing fronds, because the palm is still pulling potassium back from them to feed new growth. -
Palm leaning or root ball lifting after wind
Shallow planting, loose backfill, or skipping stakes on a young nursery palm in a windy site all let the root ball rock loose during storms. Straighten the palm and firm the soil gently around the base, then install three stakes around the root zone with soft fabric ties for at least six months. Avoid using wire or rope tight against the trunk, since both wound the soft outer tissue. -
Cold damage on lower fronds after a cool night
Coconut palms have almost no cold tolerance, and even a single night at 40 to 45°F can blacken the tips of lower fronds. The damage shows up as bronzed or water-soaked patches that turn brown within days. Trim only fully dead frond tissue, never green, and protect young palms during cold snaps by wrapping the growth point in burlap or stringing old incandescent holiday lights through the lower fronds for gentle warmth.
About This Article
