How to Grow a Santa Barbara Daisy
Plant Santa Barbara Daisy in full sun and lean well-drained soil, spaced 18 inches apart. The low perennial blooms lavender-pink from spring through fall and tolerates salt spray and ocean wind. Shear by half in late summer to refresh the bloom, and divide every three to four years.
Where to plant
Santa Barbara Daisy is a low-growing perennial groundcover for USDA zones 7 through 11. The plant reaches about 6 to 12 inches tall with a sprawling 2 to 3 foot spread. Native to the California coast, it tolerates salt spray, ocean wind, sandy soil, and drought once established.
Sun
Full sun, meaning six or more hours of direct light a day. The plant blooms heaviest and stays compact in bright sun.
In hot inland gardens in zones 9 and warmer, light afternoon shade keeps the foliage looking fresh through summer heat waves. Deep shade produces sparse blooms and floppy stretched growth.
Drainage
Well-drained soil is essential. The crown rots quickly in soggy ground, particularly in winter. Dig a one-foot test hole and fill it with water. If it sits overnight, build a raised mound 6 inches above grade or skip the spot. Rocky banks, sloped sites, and sandy ground all work especially well.
Soil
Lean sandy or gravelly soil is ideal. Rich garden soil produces lush leafy growth that flops and blooms poorly. Skip compost and amendments in the planting hole. The plant is native to coastal bluffs and evolved to thrive in lean ground.
Space
Space plants about 18 inches apart for a continuous groundcover effect. The plants knit together within a season or two and form a low blooming mat. Tighter spacing produces faster coverage but increases crowding stress within a few years.
How to plant
Plant Santa Barbara Daisy in early spring after the last frost, or in fall in zones 9 and warmer where winters stay mild. Container plants establish quickly and are usually sold in 4-inch or 1-gallon pots. Avoid summer planting in hot inland gardens, since heat stress at planting time slows establishment.
-
1Dig a shallow hole Twice as wide as the root ball and the same depth. Santa Barbara Daisy has a shallow fibrous root system rather than a deep taproot, so width matters more than depth.
-
2Skip the soil amendments Do not add compost, peat, or fertilizer to the planting hole. The plant prefers lean native soil and develops a stronger drought-tolerant root system without amendments.
-
3Slide the root ball out Loosen any tightly circling side roots without breaking the root ball apart. A gentle scoring with a knife works well on root-bound nursery plants.
-
4Set the crown at soil level Position the root ball so the top sits flush with the surrounding ground. A buried crown rots quickly in this plant. The soil flare should remain visible.
-
5Backfill with native soil Fill the hole back up with the original soil, tamping lightly. Build a small water basin around the plant for the first 2 to 3 waterings.
-
6Water deeply and mulch lightly Soak the root zone once at planting. A thin 1 inch layer of pea gravel or pine bark holds moisture without burying the crown. Avoid thick organic mulch piled against the foliage.
Watering and feeding
Watering
Water deeply once a week through the first growing season while roots establish. Soak the root zone rather than splashing the foliage.
After year one, Santa Barbara Daisy tolerates drought exceptionally well. A deep soak every two to three weeks during extended summer dry spells keeps the bloom going. Plants in coastal climates often need no supplemental water at all after the first season.
Feeding
Skip fertilizer in most cases. The plant blooms more heavily on lean soil than rich soil. A light top-dressing of compost in early spring is fine if the soil looks completely exhausted, but anything more produces floppy growth.
Avoid lawn fertilizer drift, which pushes leafy growth and reduces bloom dramatically. Container plants in pots benefit from one light feeding in early spring with a balanced slow-release fertilizer, since pots leach nutrients faster than open ground.
Pruning and maintenance
Santa Barbara Daisy benefits from one light shearing in mid summer to refresh the bloom and keep the plant compact. The plant also self-seeds freely, so light deadheading or seedling-pulling controls its spread in tidier gardens.
Summer shearing
Shear the entire plant back by about half in late July or early August, after the first heavy bloom has faded. The plant rebounds within 2 to 3 weeks and produces a second strong bloom that lasts into fall. Use hedge shears or sharp scissors and cut just above the foliage line.
Managing self-seeding
The plant produces small fluffy seed heads that drift on the wind and self-sow generously, sometimes aggressively in coastal climates. Either embrace the spread as a feature of a wild garden, or shear off spent flowers regularly through the bloom season to prevent seed formation. Pull volunteer seedlings in spring while they are young and easy to lift.
Dividing crowded plants
Every 3 to 4 years, the center of an old clump dies out while the edges keep spreading. Lift the plant in early spring, cut the live outer sections into 4 inch pieces with a sharp spade, discard the dead center, and replant the pieces at the same depth in fresh spots. Water deeply once and treat the divisions like new plants for the first season.
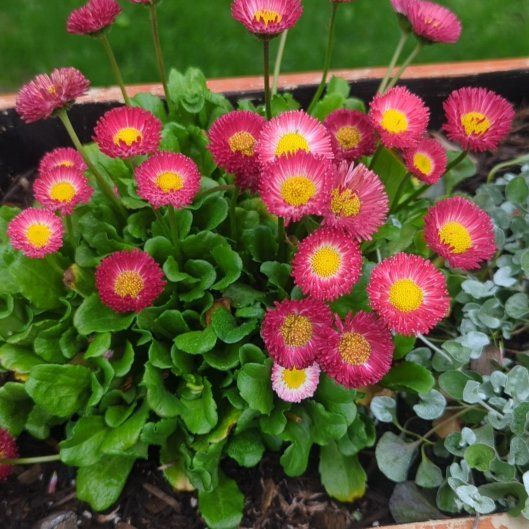
Blooming and color
Santa Barbara Daisy is grown for the small lavender-pink daisies that cover the plant from late spring through fall. Each daisy is about three quarters of an inch across with a yellow center, and the plant holds dozens of open flowers at once during peak bloom.
Bloom timing
Flowers open in late spring, usually April or May depending on the zone, and the plant keeps blooming through fall. A late summer shearing produces a second strong wave of bloom that lasts into October or even November in mild coastal climates.
The blooms open daily fresh, and individual daisies turn from lavender-pink to white as they age. The combined effect is a soft two-tone look on the same plant.
Pollinators
The flowers attract native bees, syrphid flies, butterflies, and small beneficial wasps over a long bloom window. The plant is one of the best long-season pollinator groundcovers for low-water gardens, since most flowering annuals bloom for a much shorter window.
Avoid pesticide spraying near the bush during bloom. The flowers draw beneficial insects that handle pest pressure elsewhere in the garden for free.
Cutting flowers
Cut a small handful of stems with open flowers for casual indoor arrangements. The stems are short and best suited to small jars or low vessels. Stems hold for 3 to 5 days in fresh water, and the buds continue to open indoors.
Common problems and pests
Santa Barbara Daisy is one of the easier perennial groundcovers in its range. Most trouble traces back to overwatering, overfeeding, or simply the plant outgrowing the spot.
Crown rot and sudden collapse
Caused by overwatering or poorly drained soil, especially in winter. Cut watering back, scrape mulch away from the crown, and check that the surrounding soil drains freely. Plants in heavy clay or shaded soggy spots rarely recover and need to be replaced on a better-drained site.
Floppy stretched growth
Too much shade or too much fertilizer. Move the plant to a sunnier spot in fall and stop any feeding. A late-summer shearing to half the plant's height also resets compact growth on plants that have stretched.
Powdery mildew on leaves
White powdery film on foliage, common in humid weather with crowded plants. Improve airflow by spacing new plants further apart and shearing more aggressively. Avoid overhead watering. A horticultural oil or potassium bicarbonate spray clears stubborn outbreaks.
Aphids on new shoots
Small green insects on tender spring growth. Hose them off with a strong spray of water. Insecticidal soap clears stubborn clusters. The plant tolerates light infestations well, and beneficial insects usually clean them up within a couple of weeks.
Spider mites in dry weather
Tiny webs and stippled silvery leaves, especially in hot dry stretches without rain. Hose the foliage down thoroughly to dislodge them. Mist nearby plants daily for a week. Heavy mite damage indicates the plant is too dry overall, and a deep soak resets the conditions they prefer.
Aggressive self-seeding
Volunteer seedlings popping up well beyond the original planting spot. Either accept the spread as a feature, or shear the spent flowers off through the bloom season to prevent seed formation. Pull volunteer seedlings in spring while they are young.
Center of clump dies out
Old clumps thin out in the middle while the edges keep spreading. This is normal aging behavior, not a problem. Lift the plant in early spring, divide the live outer sections into smaller pieces, discard the dead center, and replant. Dividing every 3 to 4 years prevents the problem from getting severe.
Fewer flowers over time
Caused by the plant outgrowing its space, slowly creeping into shade, or the soil becoming compacted with old root mass. Lift and divide in spring, replant the divisions in fresh sunny ground, and shear lightly after the first bloom to encourage the second wave.
Slug or snail damage on new growth
Ragged holes in the leaves and slimy trails near the crown, especially in damp coastal gardens. Hand-pick at night with a flashlight. A pet-safe iron phosphate slug bait scattered around the plants in early spring catches them before they multiply.
About This Article
