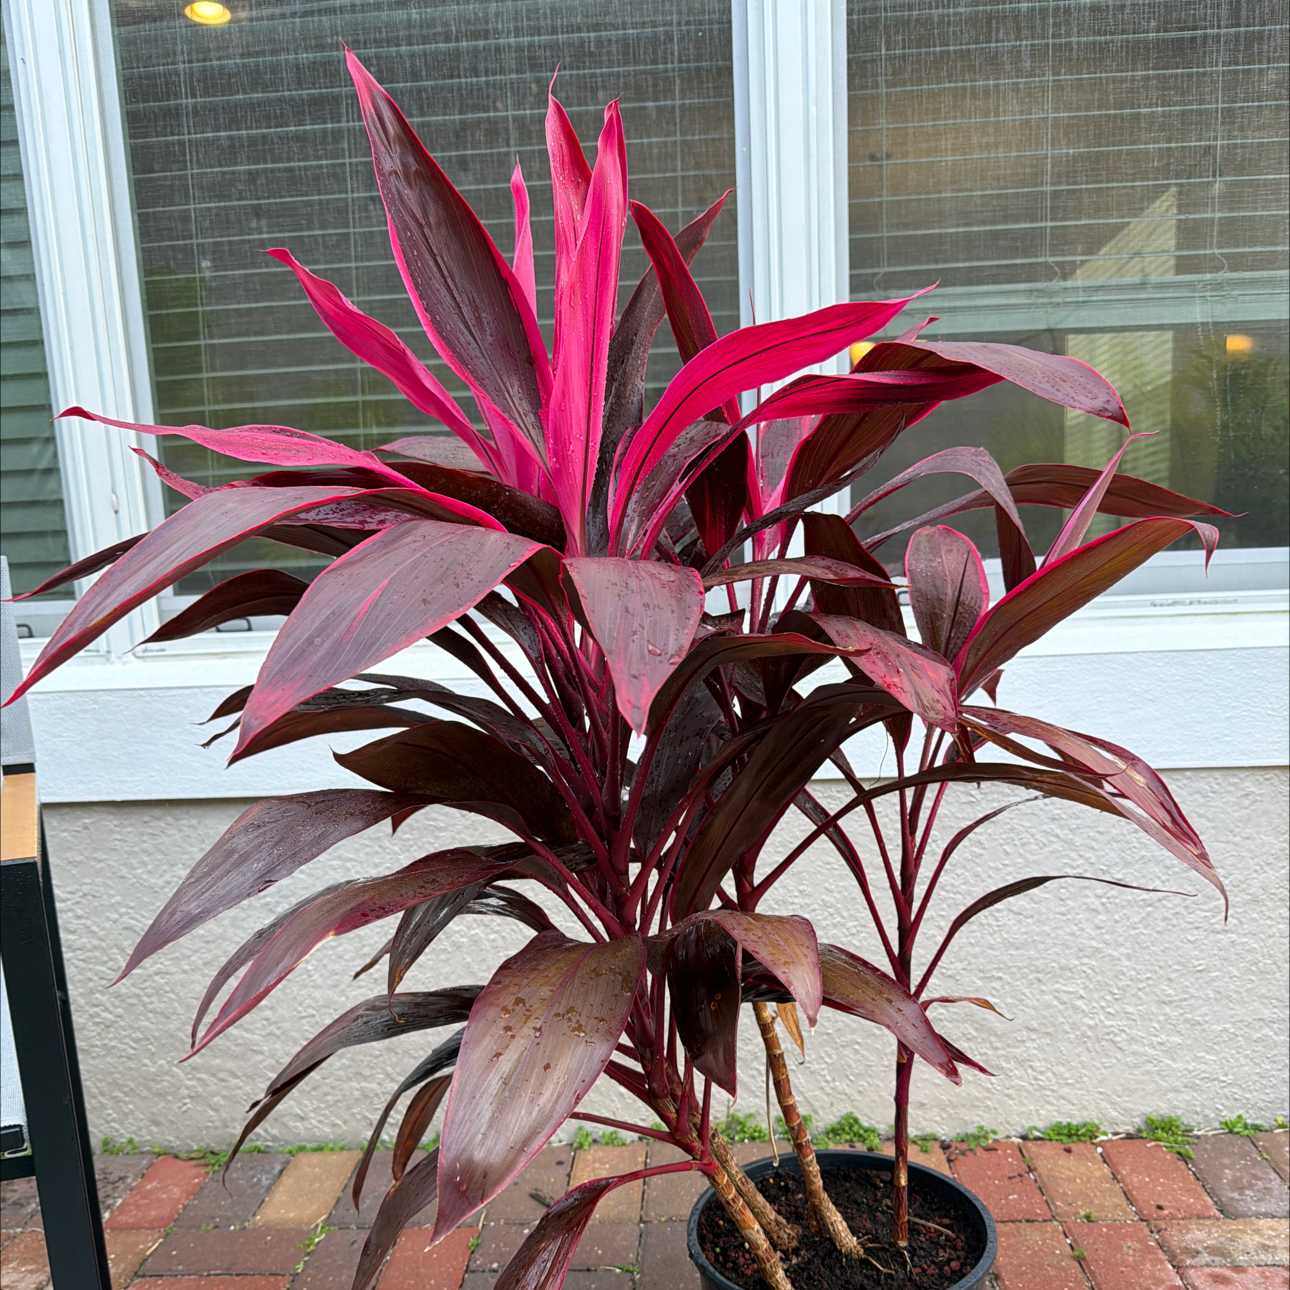
How to Grow a Cordyline Red Sister
Plant Cordyline Red Sister in bright filtered light to half-day sun, in rich free-draining soil. Outdoors it thrives in USDA zones 10 to 12. Indoors, place near a bright window and water when the top inch of soil feels dry. Bright light brings out the hot-pink and burgundy leaf color. Frost ends an outdoor plant.

Where to plant
Cordyline Red Sister is a tropical evergreen shrub grown for the dramatic foliage. Outdoors it is hardy in USDA zones 10 to 12 and matures to 6 to 10 feet tall and 3 to 4 feet wide. In colder zones the plant is grown indoors as a houseplant, where it stays smaller. The article covers both paths and notes where the care differs.
Light
Bright filtered light to half-day direct sun produces the deepest hot-pink and burgundy leaf color. Deep shade keeps the leaves greenish and dull. All-day intense sun in zone 10 or 11 scorches the leaves at the edges. A spot with morning sun and afternoon shelter usually suits the plant outdoors.
Indoors, place near a bright east, west, or lightly filtered south window. A few feet back from the glass works better than pressing the leaves directly against it. Rotate the pot a quarter turn every couple of weeks so the growth stays even.
Drainage
Free-draining soil is essential. Roots in soggy soil rot quickly, and a wet root zone is the single most common reason an outdoor or potted Red Sister fails. Dig a one-foot test hole outdoors and fill it with water. If it drains within a few hours, the spot is fine. Indoors, every pot must have drainage holes.
Soil
Outdoors, work a few inches of compost into a rich slightly acidic loam before planting. Indoors, a quality houseplant mix amended with a couple of handfuls of perlite or orchid bark works well. The mix should hold moisture between waterings without staying soggy.
Avoid drafts and temperature swings
Cordyline Red Sister is a true tropical plant. Outdoors, even a brief frost ends the season. Indoors, keep the plant away from cold drafts at exterior doors, AC vents that blast cold air, and heating registers that dry the air out. A steady warm room between 60 and 80°F is ideal.
Soil and potting
A young Red Sister grown indoors does best in a pot just one to two inches wider than the root ball. Bigger pots hold more wet soil than the roots can drink and increase the risk of root rot. Spring is the best season to pot up or repot, while the plant is putting on active growth.
-
1Pick the right pot size Choose a pot only one to two inches wider than the current root ball, with drainage holes in the bottom. Glazed ceramic and plastic both work. Terracotta dries the mix out faster, which suits a grower who tends to overwater but can stress the plant for someone who waters lightly.
-
2Mix a free-draining houseplant blend Combine three parts quality houseplant mix with one part perlite or orchid bark. The added drainage matches the plant's preference for soil that holds moisture without staying soggy. Avoid heavy moisture-retentive mixes labeled for seedlings or African violets.
-
3Set the plant at the right depth The top of the root ball should sit at the same level it did in the previous pot, roughly half an inch below the rim. Burying the lower stem causes rot. A root ball sitting too high above the soil line dries out unevenly.
-
4Backfill and firm gently Pour mix in around the sides until it reaches the same level as the top of the root ball. Tap the side of the pot to settle the mix into any pockets, then press lightly with fingertips. Avoid compacting the mix into a hard cake, since the roots need air pockets to function.
-
5Water thoroughly Soak the mix until water runs out the drainage holes, then let the pot drain fully before returning it to its saucer. The first watering after a repot settles the soil around the roots and signals the plant to push fresh growth.
-
6Hold off on feeding for six weeks Fresh mix carries enough nutrients for the first month and a half. Adding fertilizer to recently repotted roots can burn them. Resume monthly feeding after six weeks during the active growing season.
Watering and feeding
Watering
Outdoors, water deeply once a week through the first growing season to establish the root system. Soak the soil rather than splashing the leaves. Drip irrigation or a soaker hose at the base works best.
Indoors, water when the top inch of mix feels dry to the touch. Soak the pot until water runs from the drainage holes, then empty the saucer fully so the roots are not sitting in standing water. Frequency runs roughly every 7 to 10 days in summer and every two weeks in winter, but the finger test tells the truth.
Feeding
Feed monthly during active growth from spring through early fall with a balanced houseplant fertilizer at half strength. Heavy feeding produces washy paler new leaves. Light steady feeding produces the deeper hot-pink and burgundy color the plant is grown for.
Skip fertilizer entirely through the dim winter months, when the plant is not growing much and excess fertilizer salts can burn the roots. Resume in early spring once new growth appears.
Pruning and shaping
Cordyline Red Sister naturally grows as a single upright cane that loses lower leaves over time, ending up tall and leggy with a tuft of leaves at the top. Periodic cutting back encourages branching and a fuller plant. The cut canes also root easily, so a single prune produces a parent plant and several new plants.
Cutting back to encourage branching
In late spring or early summer, cut the main cane back to roughly half its height with a sharp clean pruner. The plant responds by pushing two or three new shoots from buds along the remaining cane. Use sharp clean pruners and cut just above a node.
The cut top can be rooted into a fresh new plant, and the leftover lower cane often produces additional side shoots from buried buds. A single cut-back operation usually yields three to five new plants in addition to the rebranched parent.
Routine maintenance
Snip off any fully brown leaves at the base of the leaf where it joins the stem. Yellowing leaves are usually old natural drop and can also be removed. Avoid cutting back green healthy leaves, which still feed the plant.
Propagation
Cordyline Red Sister roots easily from stem cuttings, so a single mature plant becomes a small collection within a season. The plant tolerates a heavy hand here, and most cuttings root reliably without rooting hormone.
Taking a cutting
In late spring or early summer, cut a healthy section of cane 4 to 6 inches long, with several leaves still attached. The top growing tip roots well, and so do leafless sections of mature cane farther down the stem.
If the cutting is the leafy top, leave the leaves in place. If the cutting is a leafless cane section, mark which end was the bottom in the parent plant so it goes into the rooting mix the same direction it grew. Cane planted upside down does not root.
Rooting and potting up
Push the cutting an inch or so into a small pot of moist perlite or a free-draining houseplant mix. Place in bright filtered light and keep the mix lightly damp but not soggy. Roots usually appear within four to six weeks, with new top growth following from leafless cane sections.
Once new leaves are pushing and a gentle tug meets resistance, pot the rooted cutting into a small pot of houseplant mix and treat it as a young Red Sister. Hold off on feeding for the first six weeks while the root system establishes.
Common problems and pests
Most Cordyline Red Sister complaints are pale or scorched leaves from incorrect light, root rot from heavy soil or overwatering, and a few common houseplant pests. Diagnose by reading the leaves and feeling the soil.
Pale washed-out leaves
Too little light keeps the leaves greenish rather than the saturated hot-pink and burgundy the plant is grown for. Move the plant to brighter filtered light or a few hours of direct morning sun. Indoors, a spot a few feet back from an east or west window usually delivers enough light to color the foliage up.
Scorched brown leaf edges
Too much intense direct sun, especially through south-facing window glass in summer or in zone 10 or 11 yards exposed to all-day sun. Move the plant to bright filtered light or to a spot with afternoon shade. The damaged leaves do not green back up, but new growth comes in cleaner once the light is corrected.
Brown crispy leaf tips
Usually low household humidity, hard water with high fluoride or chloride content, or fertilizer salt buildup in the soil. Group the plant with other houseplants or run a small humidifier nearby in winter. Switch to filtered or rainwater for watering, and flush the pot thoroughly under running water every few months to wash out accumulated salts.
Yellow leaves dropping
A few older lower leaves yellow and drop naturally as the plant grows taller. Widespread yellowing across the whole plant points to overwatering or root rot. Check the roots. Healthy roots are firm and white. Mushy brown roots in soggy soil need a fresh repot into drier mix and a switch to less frequent watering.
Wilting despite damp soil
A classic sign of root rot from waterlogged soil. The roots cannot take up water even though the mix is wet. Unpot the plant, trim away any soft brown roots, and repot into fresh free-draining mix in a pot only one to two inches wider than the trimmed root ball. Hold back on watering until new firm root tips appear.
Sticky residue on leaves
Scale insects or aphids feeding on sap and excreting a sugary residue. Wipe individual scales off with a cotton swab dipped in rubbing alcohol. Aphids on new growth come off with a strong spray of water and follow-up with insecticidal soap. The sticky residue often grows black sooty mold, which washes off with soapy water once the pest is gone.
Fine webbing on leaves
Spider mites in dry indoor air, more common in winter when the heating is on. Rinse the leaves with a strong spray of water in the shower once a week to knock the population back. Increase nearby humidity with a small humidifier. Insecticidal soap handles heavy persistent infestations.
White fuzzy clusters in leaf crevices
Mealybugs hiding in the protected spots where leaves meet the stem. Dab each cluster with a cotton swab dipped in rubbing alcohol. Inspect the plant weekly for a month, since the eggs hatch in waves. Heavy infestations on a large plant respond to insecticidal soap applied to the whole plant.
Soft mushy base of the cane
Stem rot, almost always from water sitting in the crown or from cold wet conditions. There is no fix for a fully rotted base, but the top of the cane often roots into a fresh plant if cut above the rot. Take a clean cutting above the soft tissue and root it as a cutting in fresh dry mix.
No new growth in winter
Normal winter slowdown in lower light and shorter days. Hold back on feeding and water less often. Growth picks back up in early spring as the light returns. If the plant is also losing leaves at the same time, check for overwatering rather than treating the slowdown itself as a problem.
About This Article
